Jonsbo C6-ITX medium budget APU build with Ryzen 8600G
I got a chance to build a medium-budget PC for light 3D CAD modeling. This PC replaced an older machine running a 5th-gen i5 with and integrated GPU. I wanted to wait for the AM5-based Ryzens G APUs, but they still haven’t arrived, and with RAM prices skyrocketing recently, I’m glad I completed this build at the end of last summer.

For this build, I had four key requirements:
- Small form factor (SFF): The case had to be smaller than my current Hyte Revolt 3 setup
- APU only: No discrete GPU – I picked the Ryzen 5 8600G
- Budget: Sub-$1000, excluding display and other peripherals
- Cooling & noise: Air cooling for zero maintenance, and very quiet operation
Table of contents
Expand the table of contents
The components
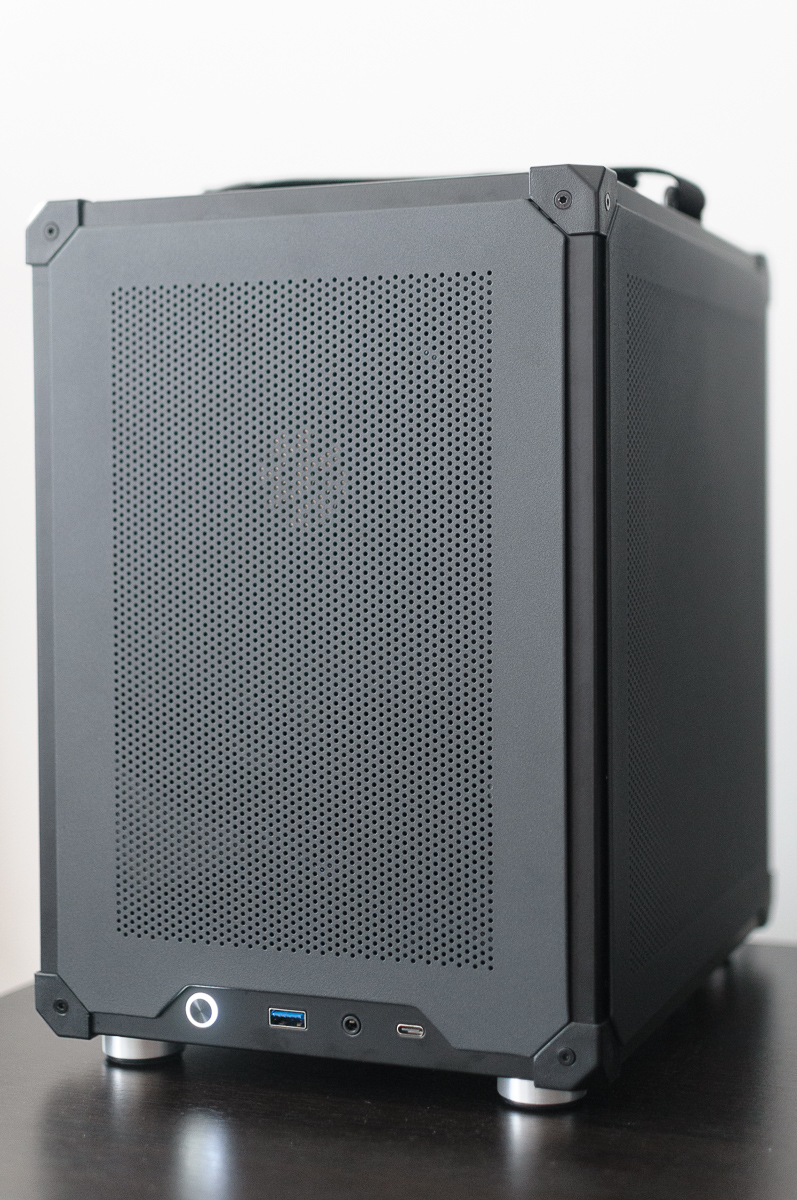
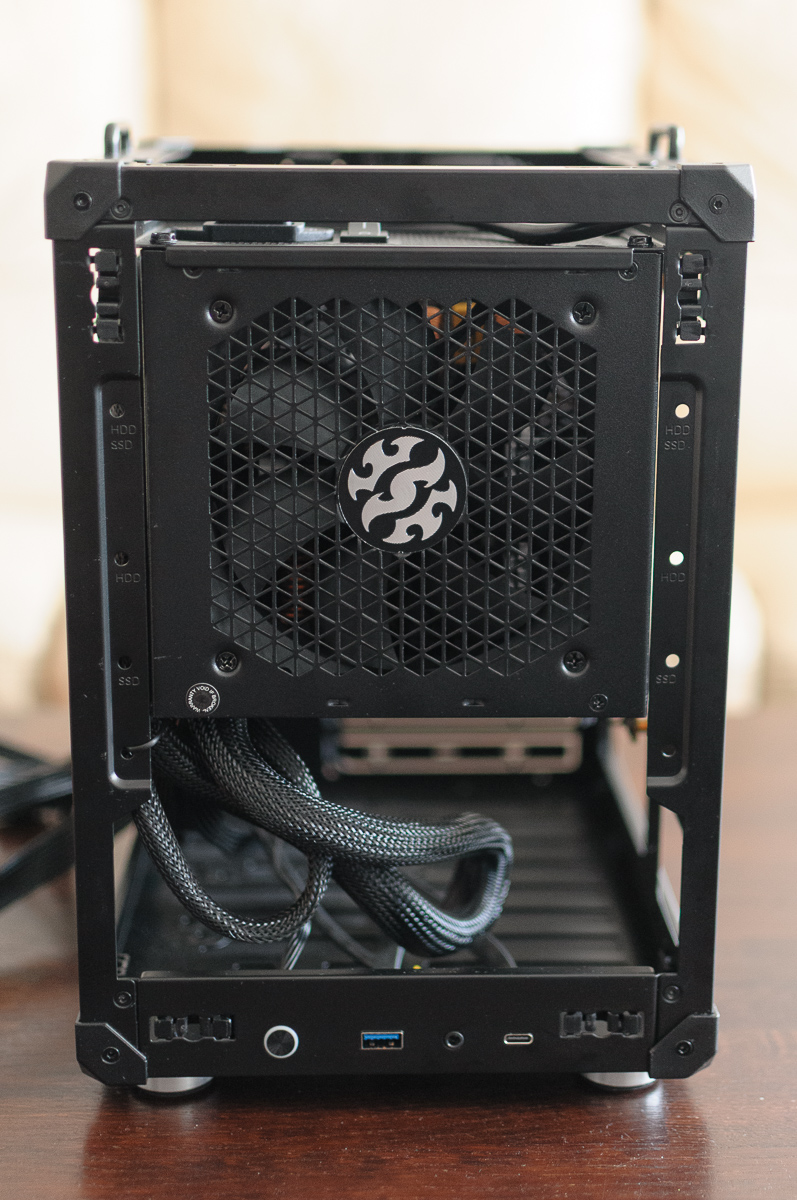
- Case: Jonsbo C6-ITX – the ITX version with the PSU mounted in the front
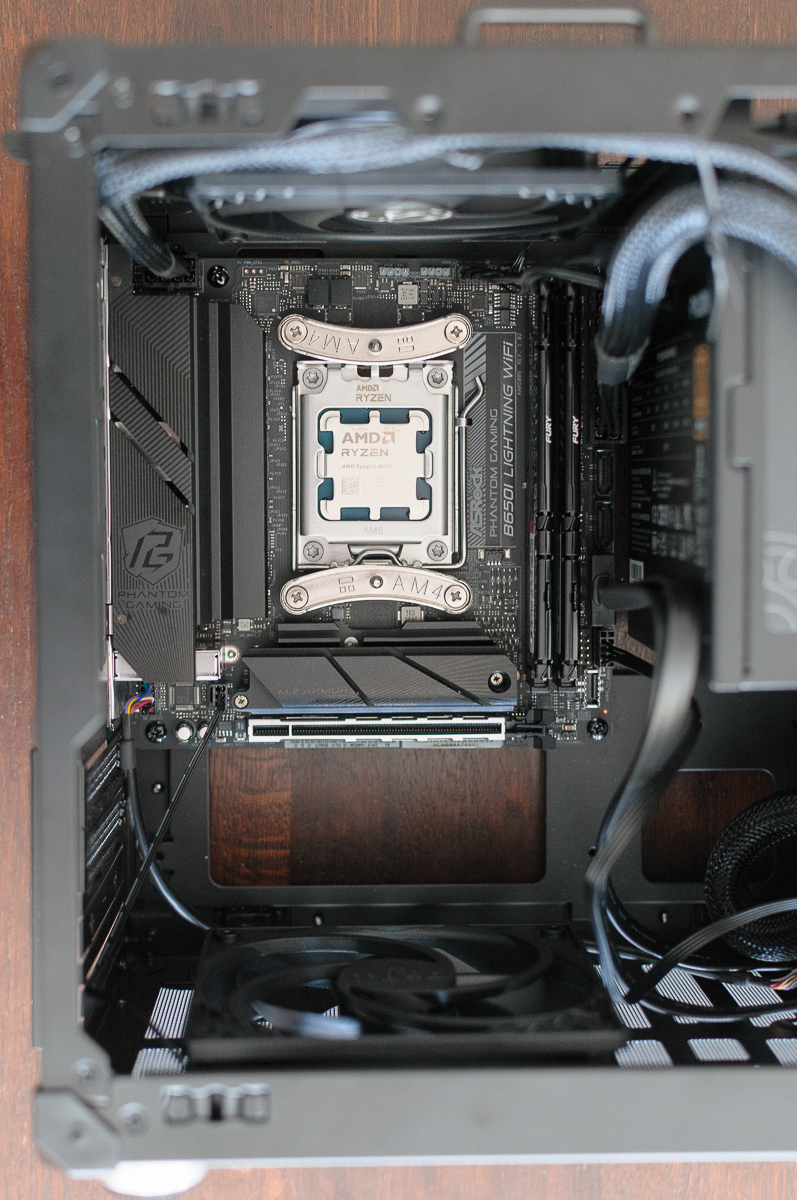
- Motherboard: ASRock B650I Lightning WiFi
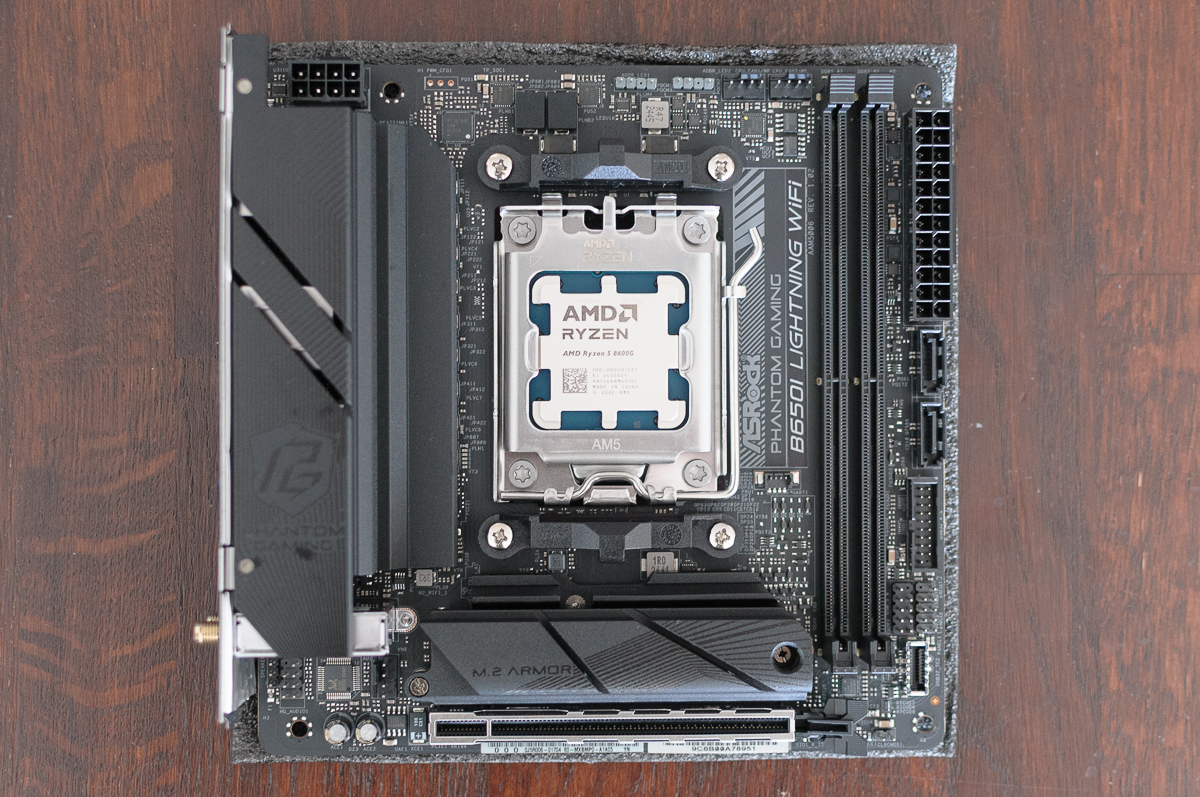
- CPU: AMD Ryzen 5 8600G
- CPU cooler: Thermalright Phantom Spirit 120 SE – overkill cooling keeps the PC quiet even under full load
- RAM: Kingston FURY Beast 2x16GB DDR5-6000 CL30 EXPO
- SSD: Samsung 990 EVO Plus 2 TB
- PSU: Full-size ATX ADATA XPG PYLON 550W – not my first choice, more below
- Case fans: two 120 mm Arctic P12
Assembly
The build order isn’t very different from standard PC builds, but the PSU size and placement changes things. Because I used a full-size ATX power supply that almost touches the motherboard, installing the PSU after the board is easier. Smaller SFX/SFX-L units could be installed first, but they were out of budget.
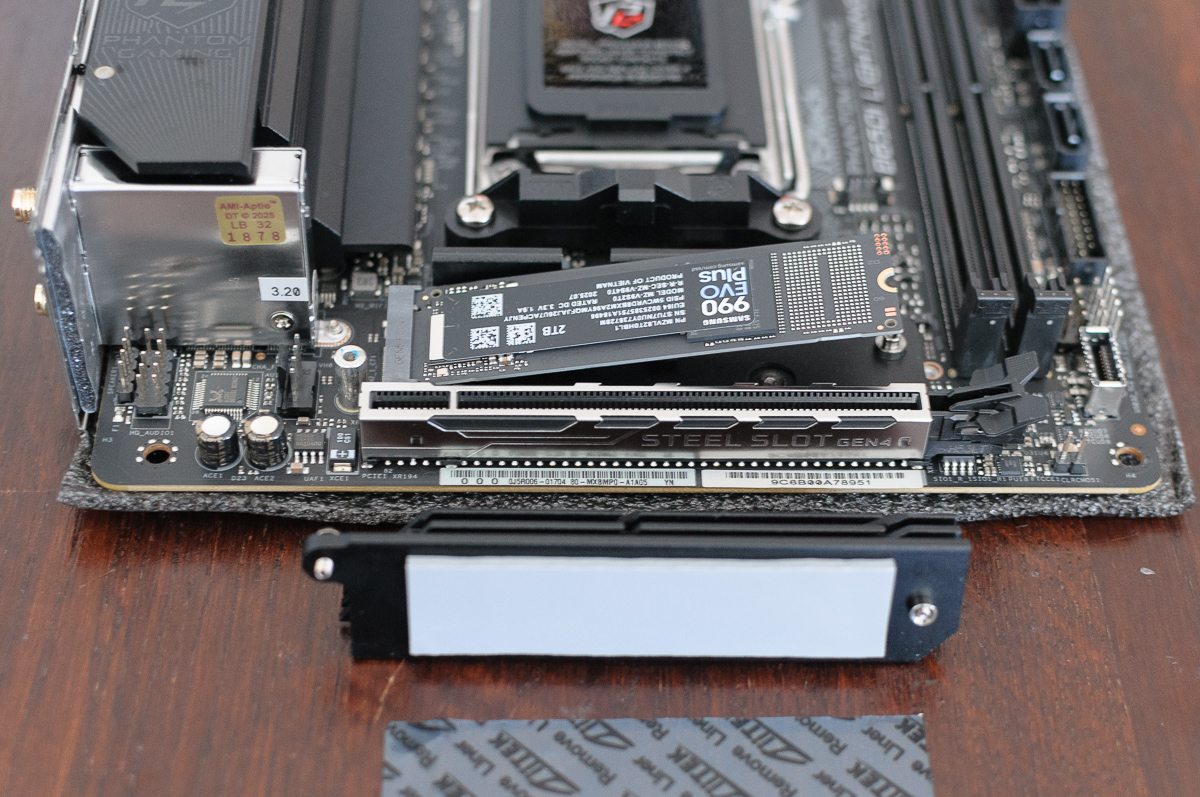
Let’s start by preparing the motherboard. First, install the NVMe SSD drive beneath the board’s heatsink, then plug in the memory sticks. Next, insert the CPU into the socket and install the cooler mounting adapter. The motherboard is now ready for mounting.
Putting everything into the case
I chose the Jonsbo C6-ITX for its size, price, and large maximum CPU cooler height clearance (170 mm). There’s a standard C6 model that also accepts mATX boards, but its PSU mounts directly above the CPU, limiting it to slim CPU coolers only (75 mm). I wanted a large dual-tower cooler to keep the system quiet.
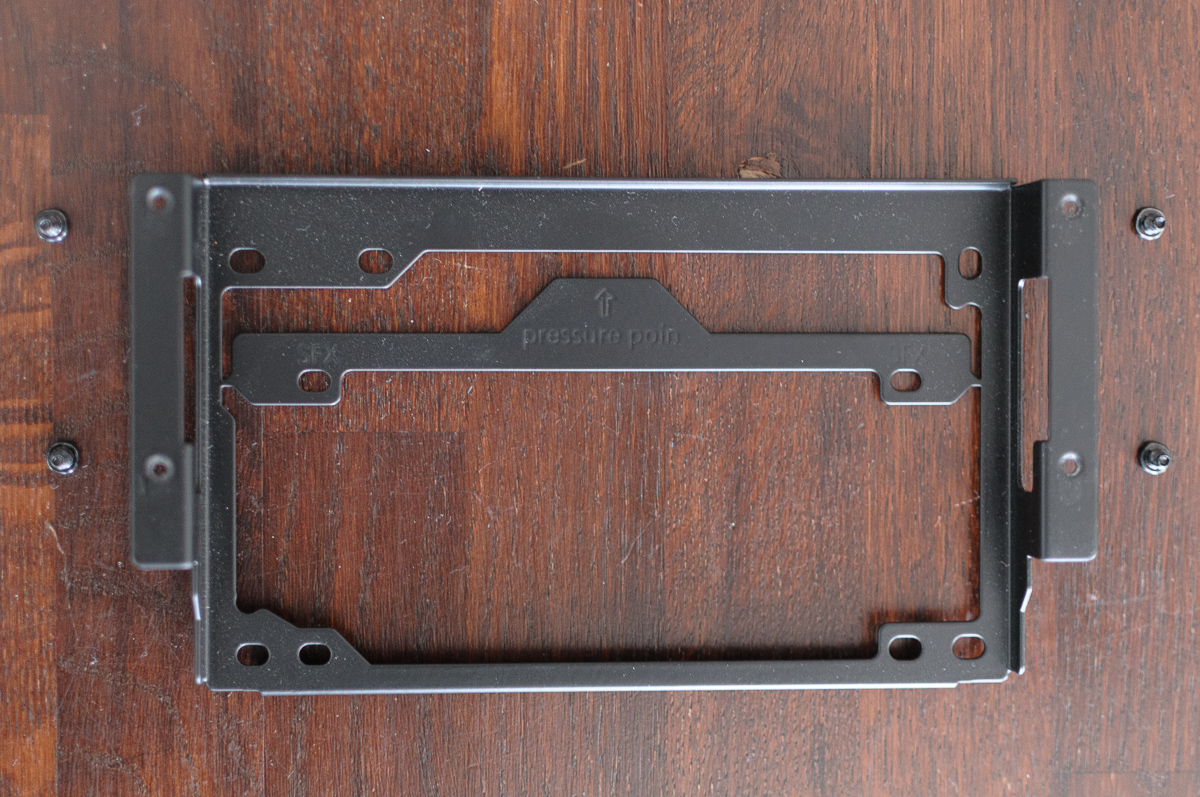
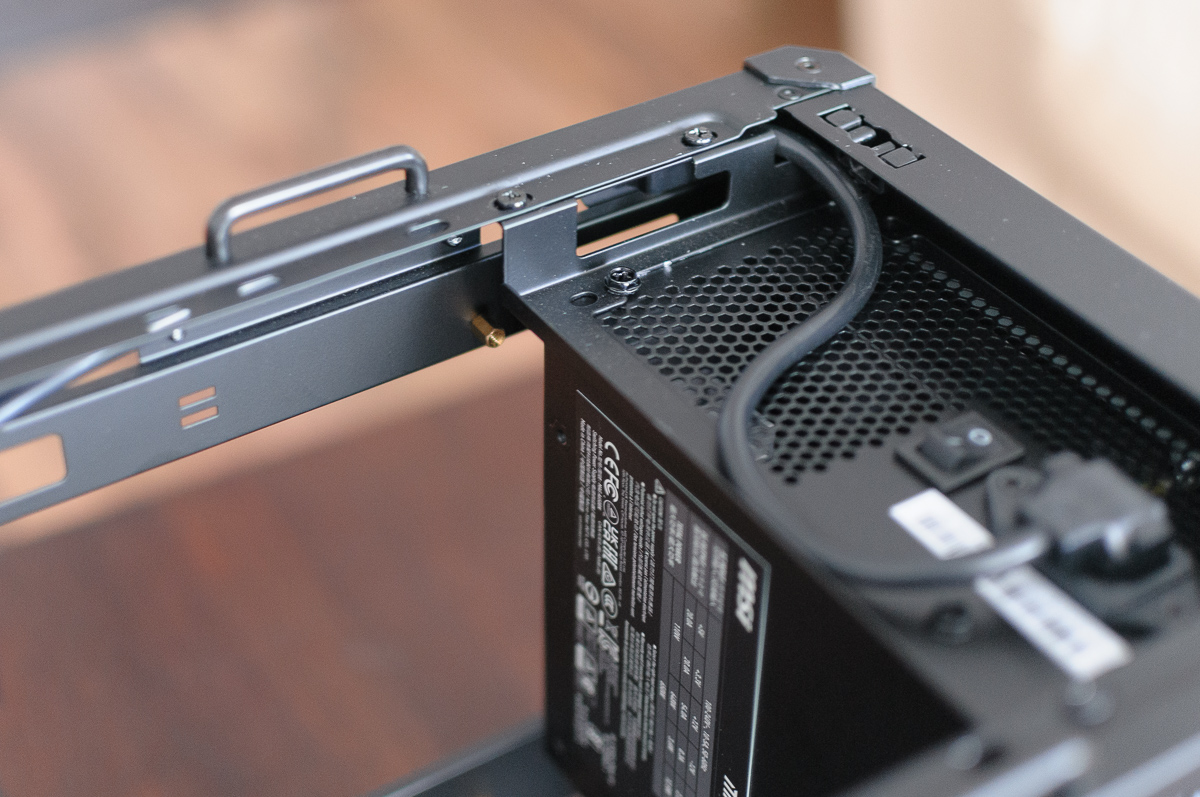
Next, disassemble the case according to the instruction manual and secure the prepared motherboard. Because I used a full-size ATX power supply, I had to remove the SFX adapter from the PSU bracket. A word of warning: think twice before removing it. I almost reached a point where I needed to switch to an SFX PSU, but couldn’t, because the adapter was already gone.
After securing the motherboard and PSU I connected all the necessary cables: the 24-pin motherboard power cable, the CPU power connector, and the front panel’s USB, audio, and power connectors.
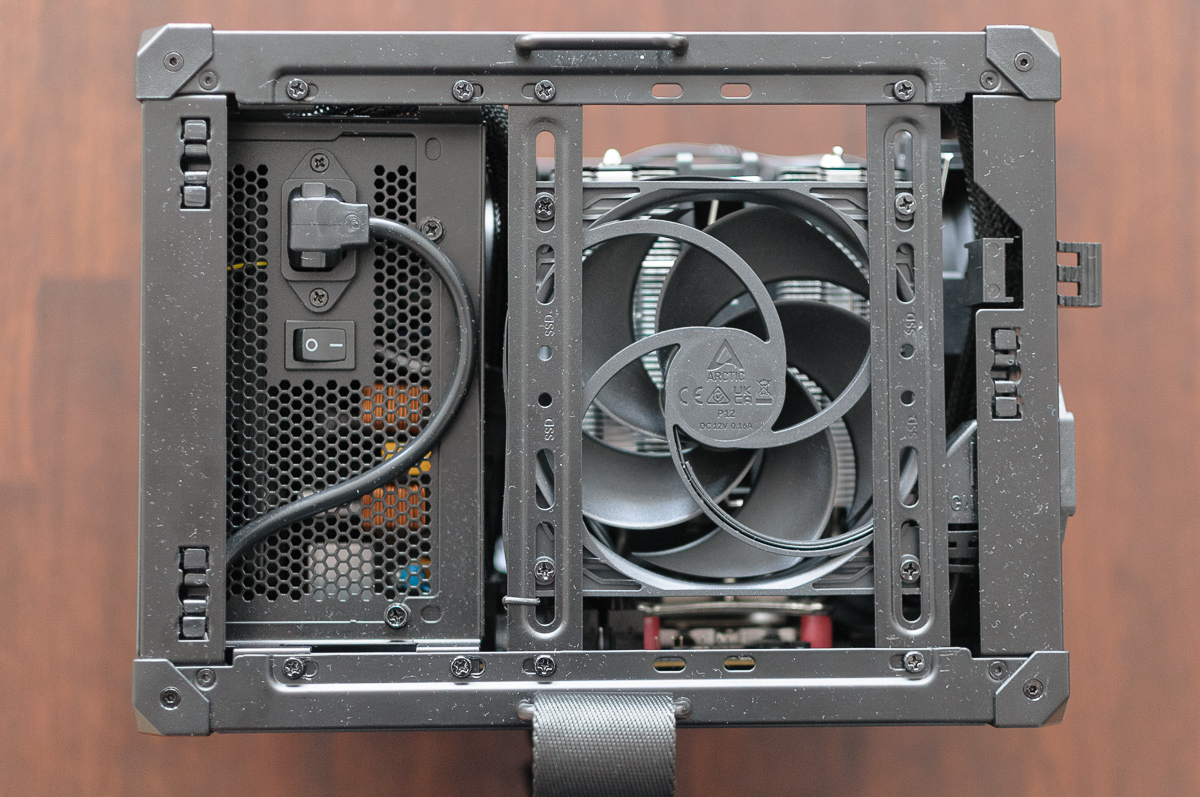
Next, I mounted the top and bottom case fans and plugged them into the motherboard. For that, I removed the fan brackets from the case, attached the fans to them with screws, and finally secured everything back inside the case. To remove the bottom bracket, I had to unmount the feet and remove the bottom dust filter.
For this build I used the 3-pin non-PWM version of the 120 mm Arctic P12 fans because the PWM versions were out of stock. With just three pins, their RPM can still be controlled through DC regulation1 instead of PWM. The Arctic P12 are arguably the best budget fans, often beating more expensive alternatives. When budget allows, I opt for Noctua NF-A12x25 (or their newer G2 revision) or be quiet! Silent Wings 4. Otherwise, the Arctic P12 (or other sizes from their P-series) are my go-to choice. Maximum RPMs are irrelevant to me – I never want my fans spinning at 3000 RPM or even 1500 RPM. What I care about is the best noise-normalized performance, and that’s where the Noctua fans shine.
With no discrete GPU, the last component to mount was the CPU cooler – the Thermalright Phantom Spirit 120 SE. Tower coolers typically push hot air out the back, but in SFF cases the opposite is often better. So I used a flipped orientation to pull fresh air directly from the back of the case.
The cooler can’t be mounted with the middle fan attached because it covers the mounting screws, so I removed it first. I then adjusted the rear fan’s vertical position to fit precisely above the motherboard’s VRMs. Before screwing the cooler onto the CPU, I applied the pre-packaged Thermalright TF7 thermal paste in an X-pattern onto the CPU’s integrated heat spreader (IHS), peeled off the cooler’s protective label, and carefully placed the cooler onto the CPU. I lightly secured the two retention screws for initial grip, then tightened them one full turn at a time, switching back and forth until the cooler was evenly aligned and fully secure.
Finally, I remounted the middle fan. Before clamping it in place, I connected the other fan to a PWM splitter and attached the splitter to the board’s CPU1 connector. Then I clamped the middle fan and used tweezers to connect its cable to the PWM splitter.
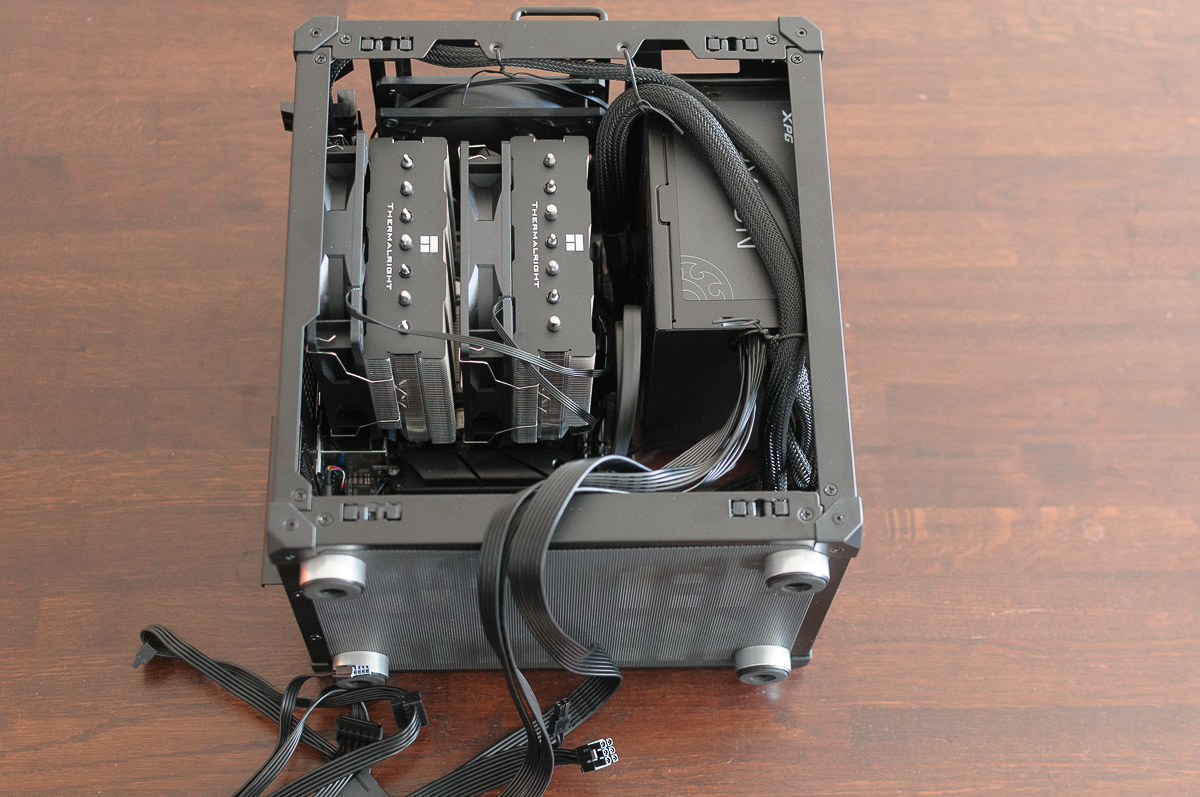
With all parts in place, it was time to tidy up the cables. Since the budget ATX PSU is non-modular, I had quite a few extra cables dangling around. The case had plenty of space for tucking them away, primarily because the build has no GPU.
Power supply
Full-size ATX PSUs compatibility
For a medium-budget build without a dedicated GPU, I focused on C-Tier PSUs on the SPL’s PSU Tier List . Based on availability and reviews, I bought the MSI MAG A650BN, which is probably the best bronze PSU for low-end builds.
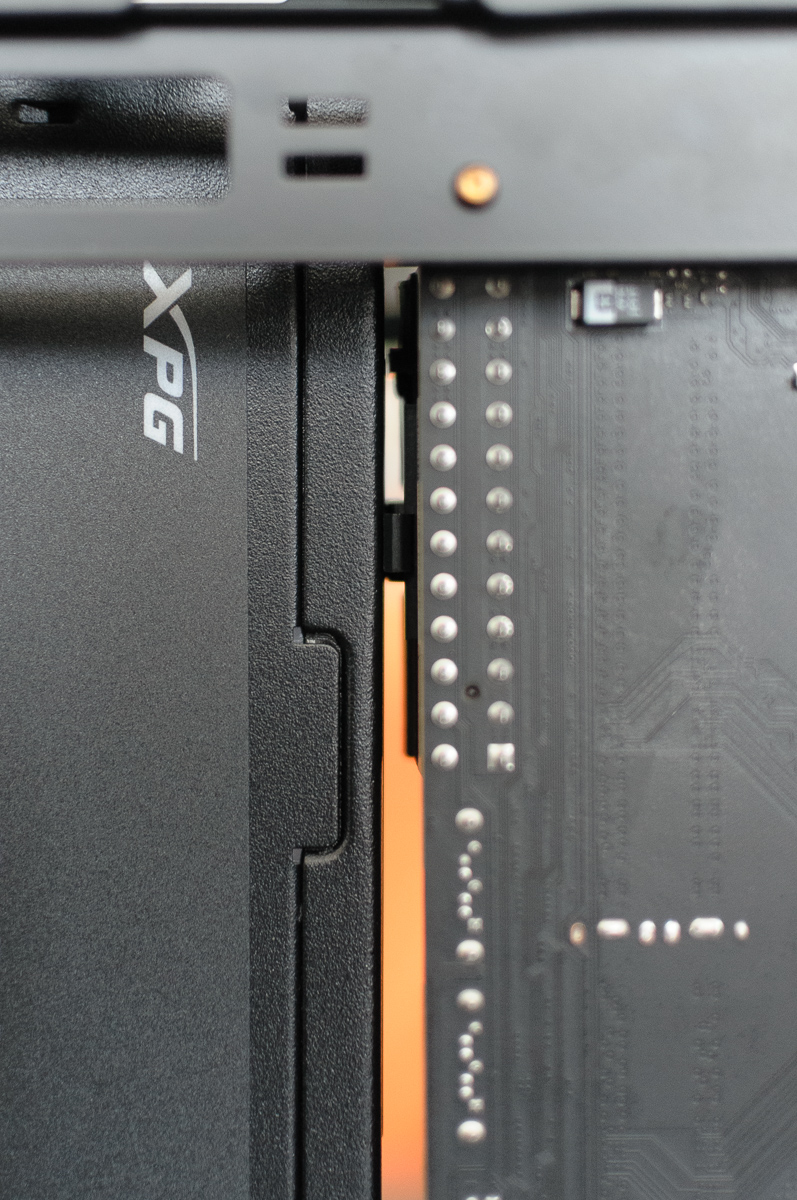
The only problem: it didn’t fit in the Jonsbo C6-ITX case. This MSI unit is slightly larger than the ATX spec, measuring 151.6 mm wide (instead of 150 mm) and 88.3 mm high (instead of 86 mm). This was largely due to the MSI logo on the grill, which added 1.7 mm. Inside the case it touched the motherboard’s 24-pin power connector, and the logo pushed against the front panel, preventing it from closing. I almost bought a smaller Fortron SFX PRO 450W (another C-Tier) next, but the SFX bracket was already permanently removed from my case. I highly recommend using an SFX PSU in this case to spare yourself several headaches.
In the end, I managed to fit a C+ Tier PSU, the ADATA XPG PYLON 550W. It fit inside – barely – but everything closed without issues. This PSU has two compromises: it suffers from coil whine when idle, and the fan bearing is louder than I prefer (though my noise tolerance is very low). From a one-meter distance, neither issue is a major problem.
Thermal paste
The pre-packaged Thermalright TF7 paste was too thick (perhaps it had gone bad?). My Ryzen 5 8600G idled at 43 °C, which is fine, but it shot straight to TJ Max2 under load and began throttling. The paste was spread evenly over IHS, as revealed by removing the cooler, and other people have reported positive results with this paste, so something was definitely wrong with my batch ¯\_(ツ)_/¯
I repasted the CPU using a leftover be quiet! paste from my last build’s Dark Rock TF 2 cooler, also applying the X-pattern. Idle temps dropped to 32 °C, and temperatures under load are good now.
Air flow and cable management
In small cases, achieving positive air pressure (more intake fans than exhaust fans3) is usually better. Getting fresh air directly onto the CPU cooler is also critical, which is why I opted for the flipped cooler orientation. This setup pulls air into the case instead of blowing it out. The traditional orientation, combined with the front-mounted ATX PSU, would have meant the CPU fans were pulling hot air directly from the PSU, forcing the fans to run much louder.
My final configuration: CPU fans intake from the back, PSU intakes from the front, bottom fan also intakes, and the top fan is the only exhaust. This creates positive pressure, which is excellent for minimizing dust build-up inside the case.
For budget reasons I couldn’t use a modular PSU, resulting in many unused cables. Without a discrete GPU and with the case’s near-16L volume, I was able to hide all excess cables neatly beneath the PSU. There’s still space left for a smaller discrete GPU if needed.
Temperatures, noise, and coil whine
Even with the new thermal paste, I was surprised by how hot the Ryzen 5 8600G runs under load. My previous build used a newer AM5 Ryzen 7 9700X, which has the same 65 W TDP, but runs much cooler even with a weaker cooler. The next obvious step was to undervolt the CPU and its integrated GPU (iGPU).
The replacement PSU, the ADATA XPG PYLON 550W, has slight coil whine, especially when the PC is idling. I wouldn’t purchase this unit again because of that alone.
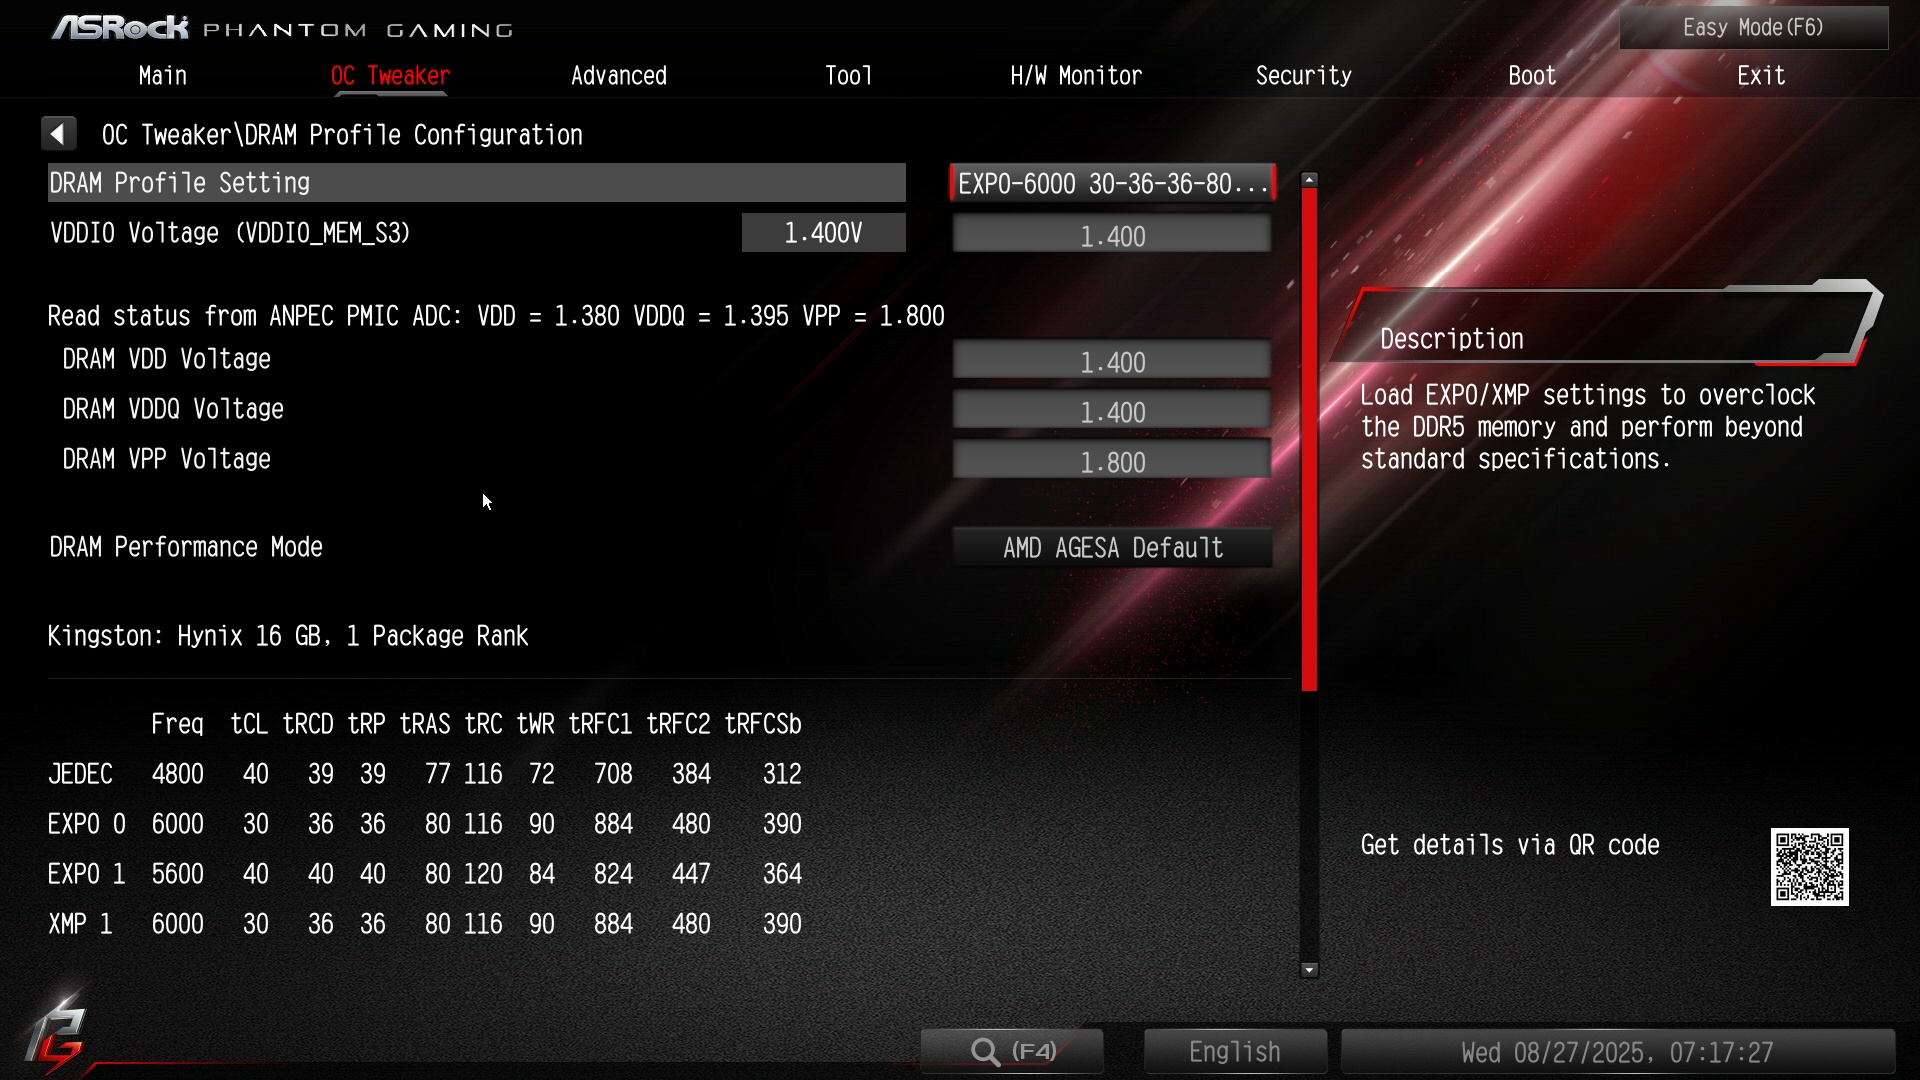
RAM EXPO
First, don’t forget to enable EXPO on your memory in the BIOS. Otherwise, the modules will run at much lower frequencies by default. Enabling EXPO4 sets the memory timings to the declared values – primarily the frequency – which provides a significant performance boost. This is extra important with APUs like the Ryzen 5 8600G, where the iGPU shares system memory with the CPU and needs the fastest possible speed. Higher memory frequencies slightly raise both power consumption and system temperatures though, which brings us to the next step: improving thermals through undervolting.
Undervolting and power limit
Undervolting is the primary reason I chose a B650-based motherboard. Cheaper B620 boards typically lack this functionality in the BIOS. Undervolting safely lowers power consumption, which directly reduces heat while preserving performance. Every CPU is slightly different and can handle varying levels of undervolting before applications begin crashing. Excessive undervolting causes the computer to freeze with a BSOD or kernel panic.
I had only three days to finish this build and lost two to the PSU compatibility issue. This left limited time for proper fine-tuning and stability testing, so I played it safe, knowing I wouldn’t have access to the PC afterward.
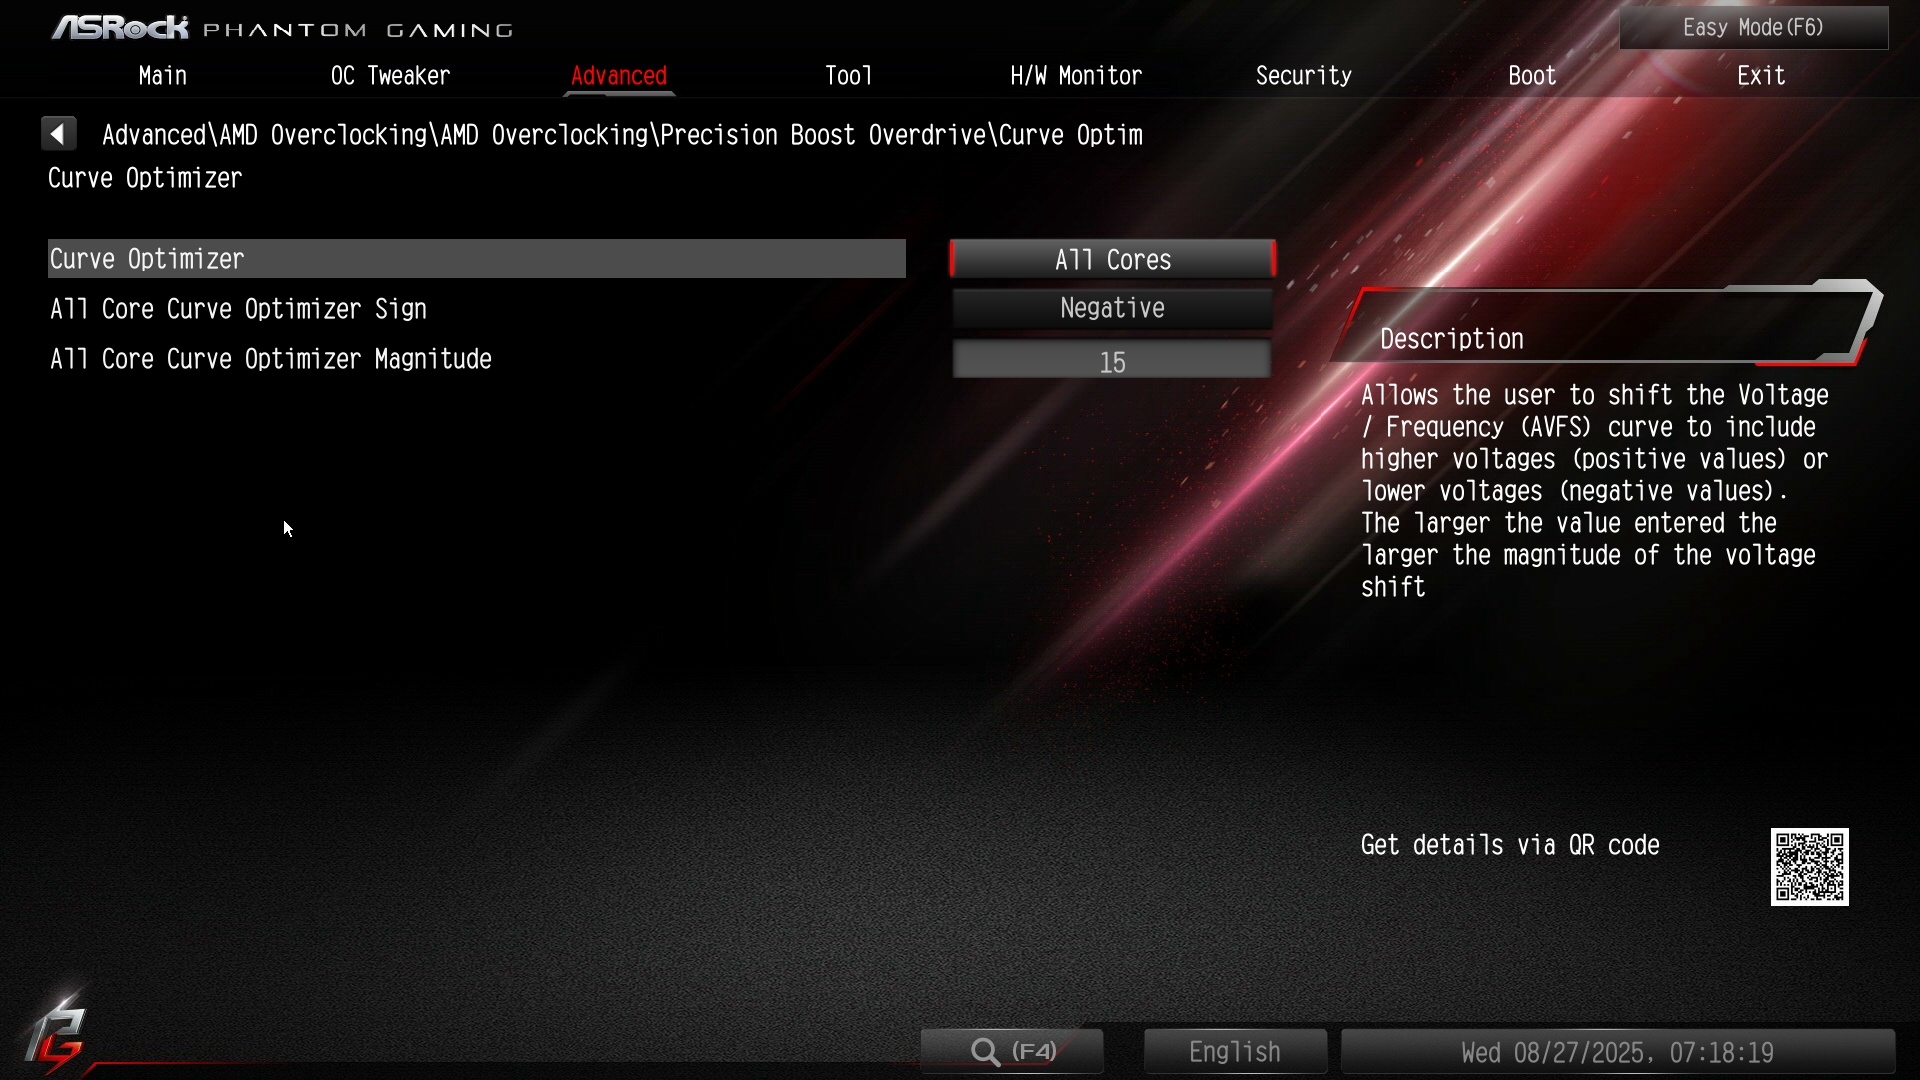
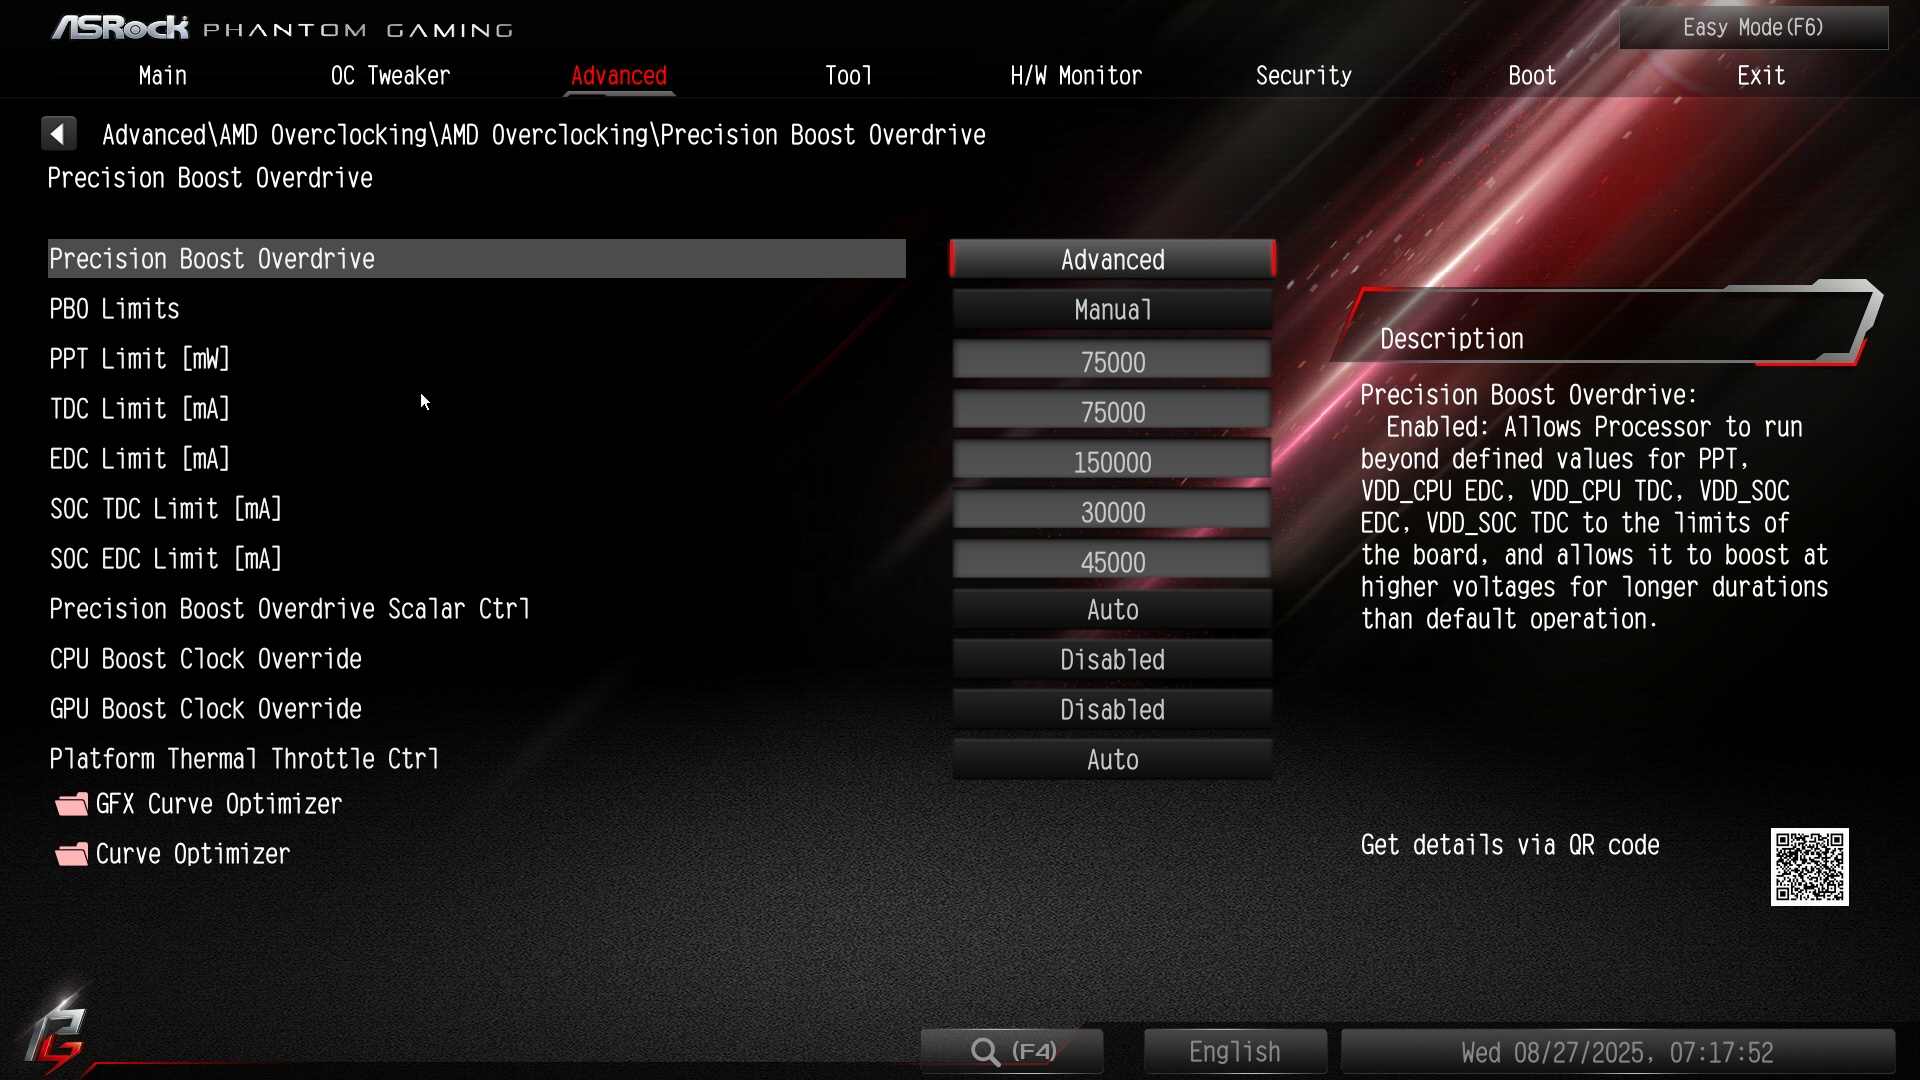
I undervolted the CPU in the BIOS using AMD’s Precision Boost Overdrive (PBO) Curve Optimizer (CO). The perfectly stable value I settled on was -17 mV on all cores. A value of -20 mV wasn’t stable in the OCCT AVX 2 thread cycler stress test, though surprisingly even -30 mV was stable in the Cinebench 24 multi-threaded benchmark. Given more time, I would likely have found better values for daily use.
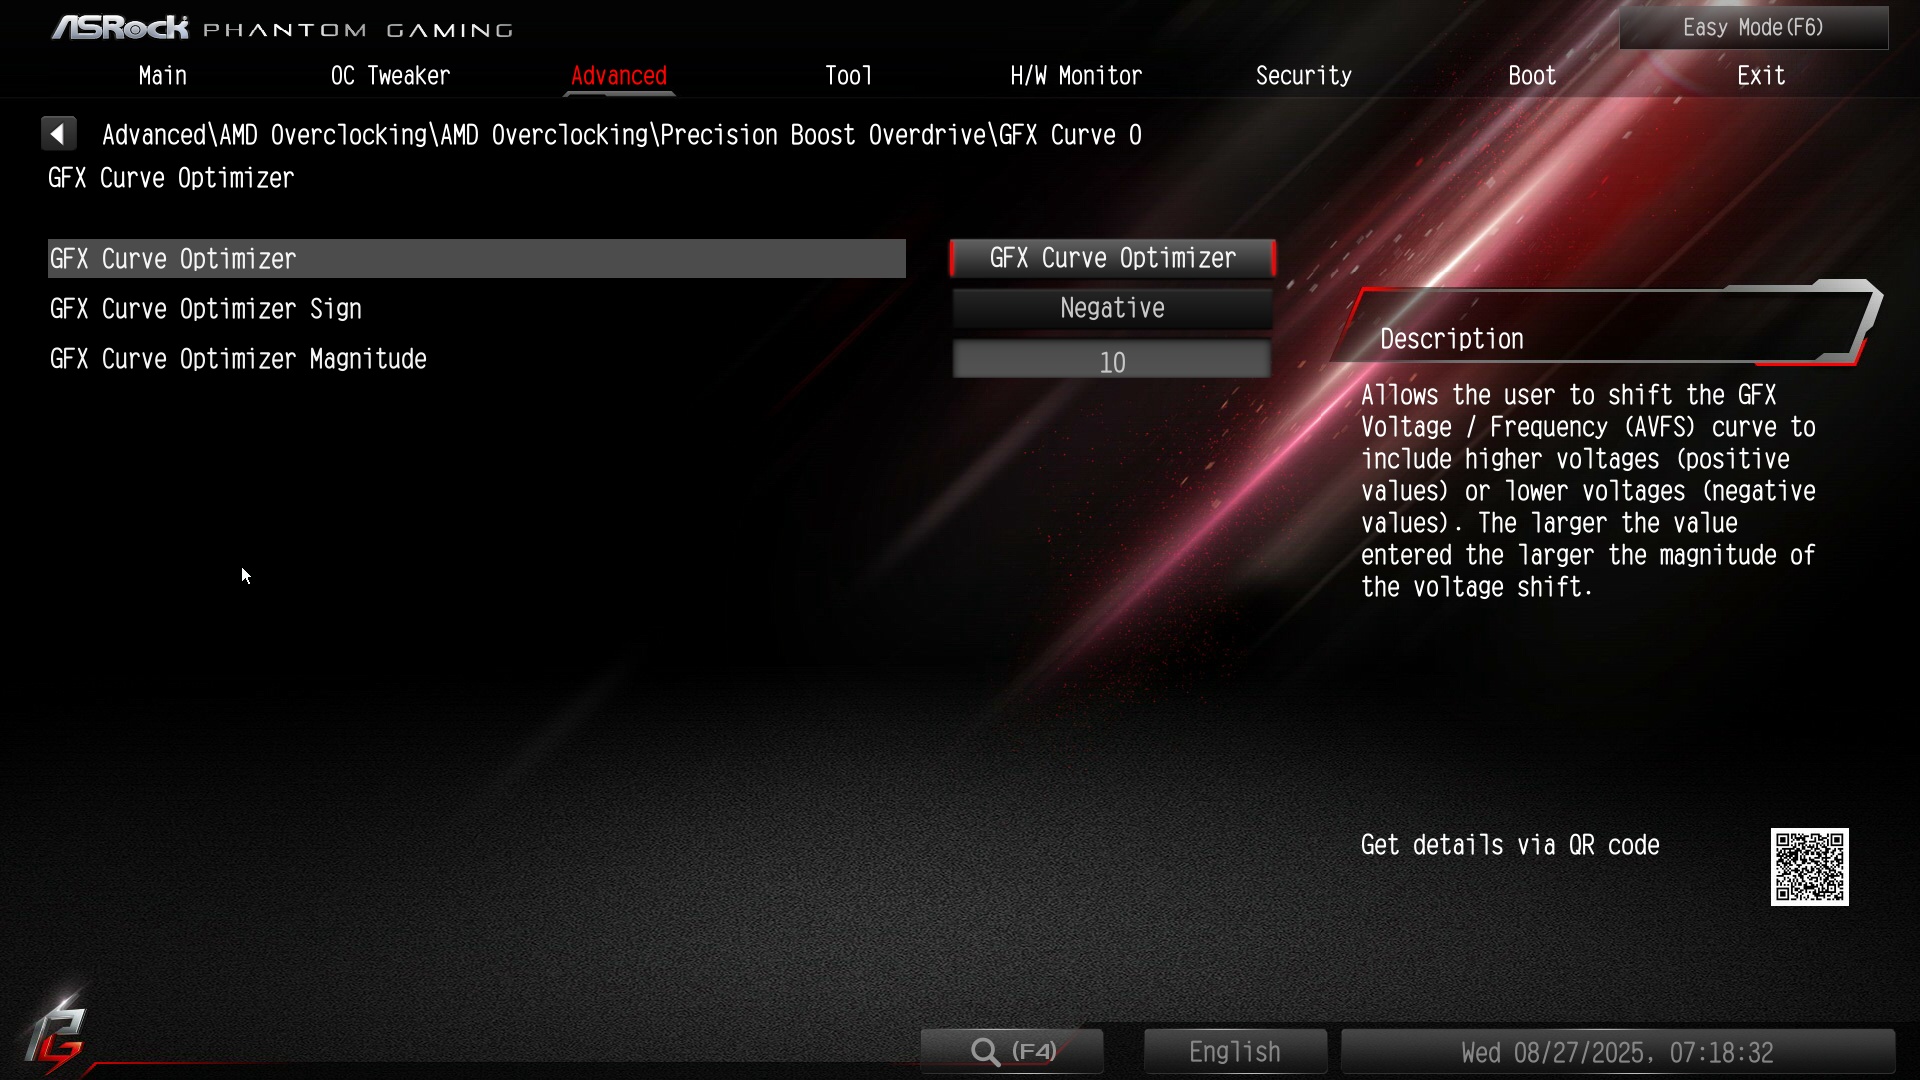
I also undervolted the iGPU using PBO GFX CO with a value of -10, saving a bit more power and reducing heat.
Stress testing the system at the end of summer with ambient temperature of 26 °C, the CPU was still hitting TJ Max (95 °C), although it managed to do so without triggering thermal throttling.
I wasn’t satisfied that the PC could reach TJ Max under extreme load, so I decided to reduce the default Package Power Tracking (PPT) limit from 88 W down to 75 W. Now the CPU never reaches 90 °C, remains stable in the core cycler test, and performance is reduced just a little bit. The important thing is, that this adjustment doesn’t affect single-core performance, as one core can’t reach the PPT limit on its own.
Custom fan curves
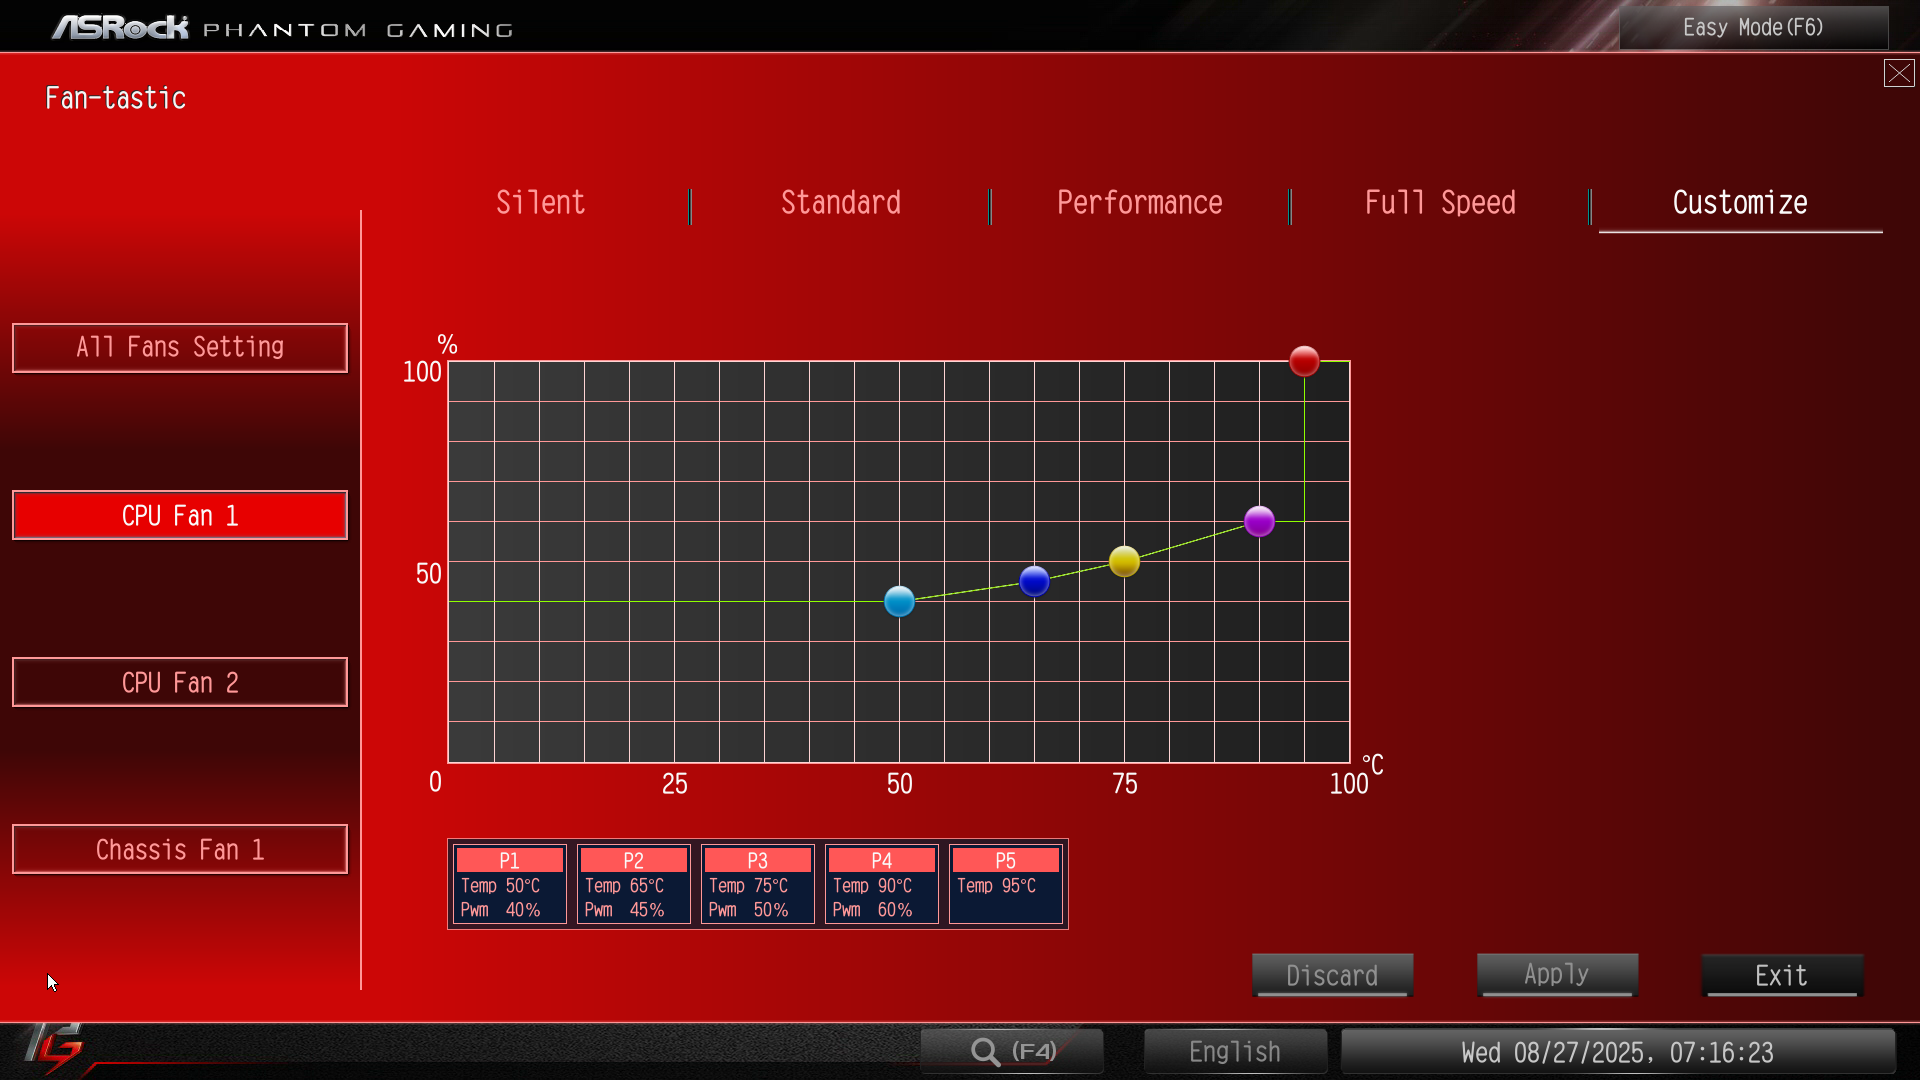
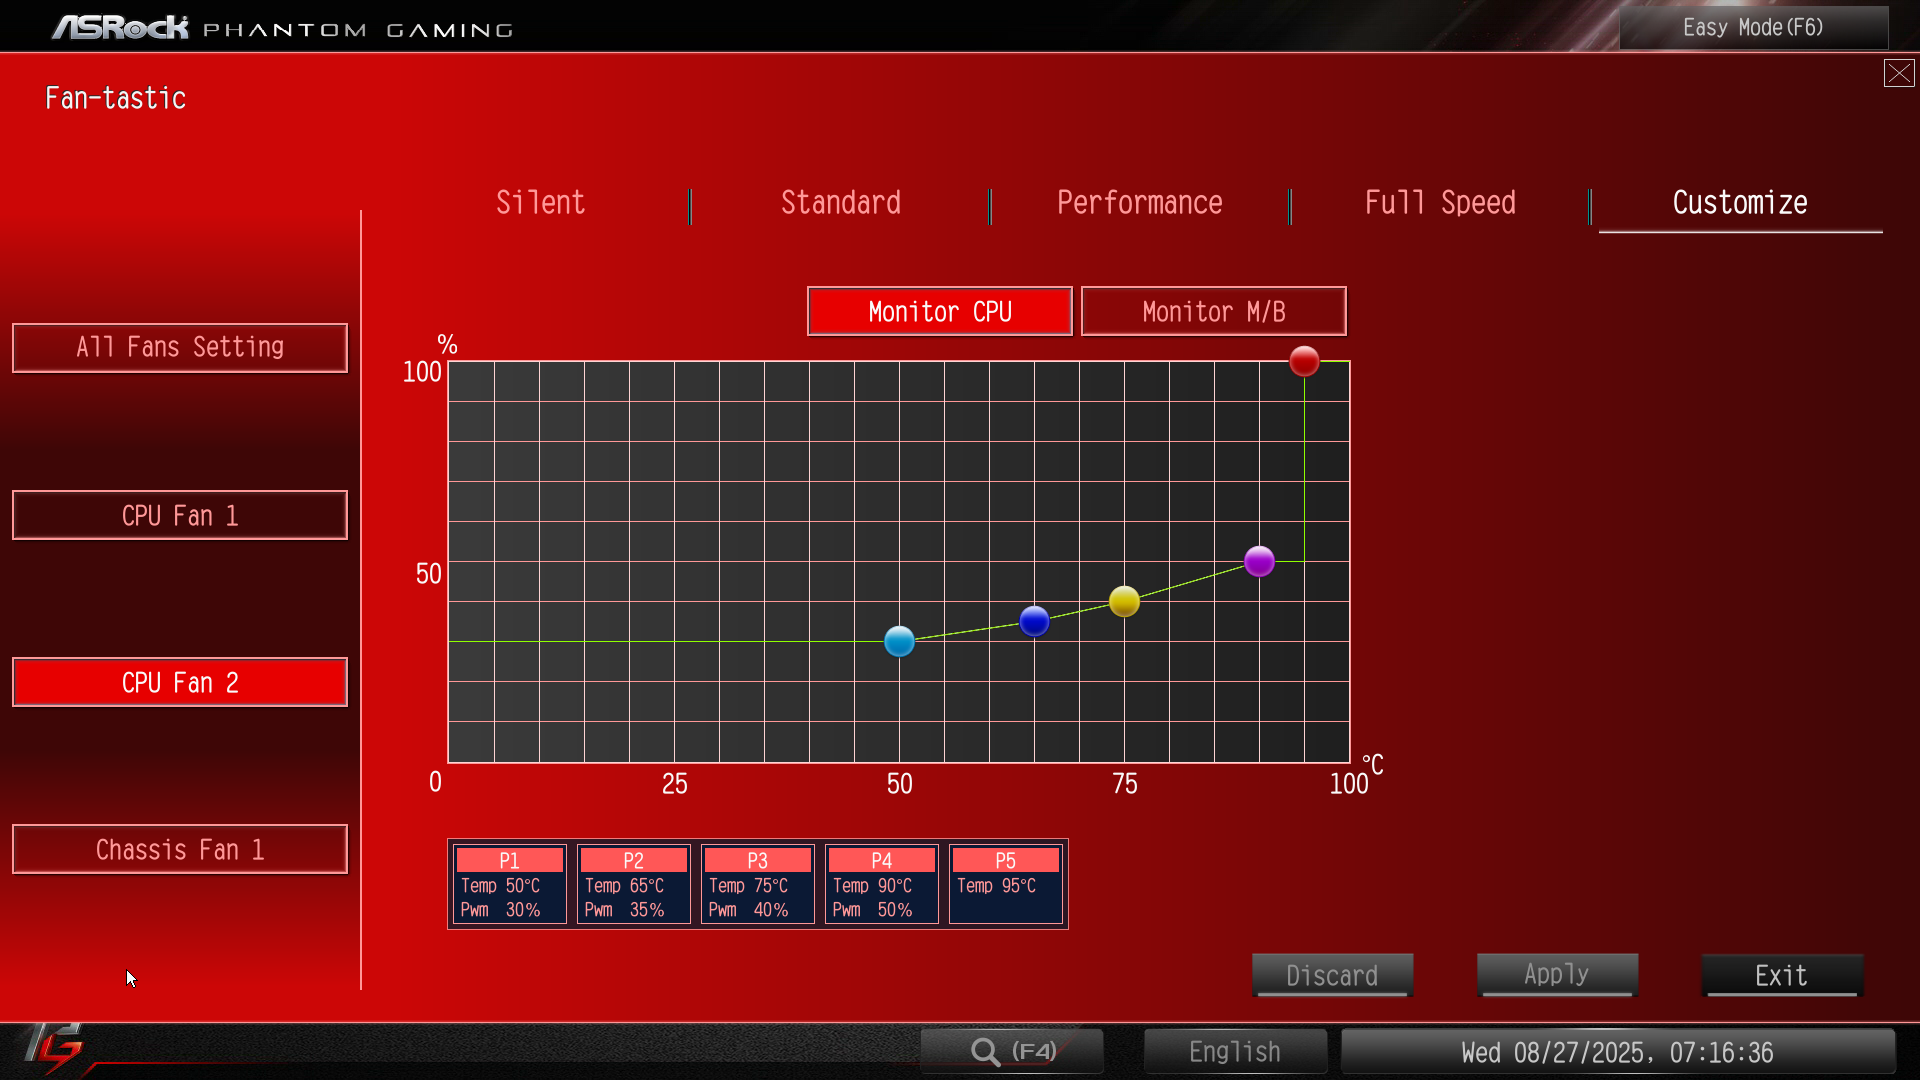
I also set quiet custom fan curves, primarily because the default settings – even in silent mode – were too loud. I configured these curves directly in the BIOS, as I generally avoid third-party applications like Fan Control. It’s fantastic software capable of configurations not possible in BIOS, but it requires a program to start on every boot and isn’t easily transferable between clean reinstalls. BIOS-set fan curves are system-independent, meaning I can wipe the system, replace Windows with Linux, and the fans will behave exactly the same.
I set the fans to spin at ~700 RPM when the CPU is idling and ~1000 RPM at full load. With these speeds, the CPU never reaches 90 °C, which is well below TJ Max, and the system stays relatively quiet. I prefer higher idle RPMs to prevent dust build-up and sudden fan acceleration noise. When fans idle too low, sudden load spikes the CPU temperature, forcing the fans to ramp up quickly to higher speeds, which creates noticeable noise bursts.
The Arctic P12 and Thermalright fans are louder than Noctua NF-A12 (G2) and be quiet! Silent Wings 4 at these speeds, so the system isn’t completely silent. I’m sensitive to noise, so for some people even 1000 RPM Thermalright fans might be silent, but not for me. SFF case with mesh panels also lets out more noise than larger cases. If I’d had more time, I would have swapped the Thermalright fans with spare _Arctic P12_s, which are quieter. Sorry, next time.
Conclusion
Building a PC in this 15.9L SFF case, the Jonsbo C6-ITX, was fun and fairly easy, but I strongly advise opting for an SFX power supply. The case has space for large dual-tower CPU coolers, allowing it to run very quietly even with more powerful CPUs under heavy load. There’s also space for 255 mm long GPUs (80 mm × 255 mm × 170 mm).
The Ryzen 5 8600G surprised me with how hot it can run, but thanks to the overkill Phantom Spirit 120 SE cooler it stayed under control and quiet. It needed undervolting and a reduced PPT power limit, but the time spent tuning was worth it. There’s no loss in single-core performance, and only a very small multi-threaded performance loss resulted from the lowered PPT limit. Surprisingly, both the single-core (113) and multi-core (816) Cinebench 24 values are above average, probably thanks to fast memory?
With an ambient temperature of 26 °C, the CPU idles at a very cool 33 °C. This is likely due to another surprising 8600G feature: it consumes single-digit watts of power when idle. When stress tested with OCCT AVX 2, temperatures averaged around 82 °C with an 86 °C maximum. With more realistic stress testing, the Cinebench 24 benchmark averages around 56 °C with spikes to 69 °C in the single-core benchmark, and 82 °C average with 85 °C max in the multi-core benchmark. All temperatures are the CPU package temperature.
| Average | Maximum | |
|---|---|---|
| Ambient temperature | 26 °C | 26 °C |
| Idle CPU temperature | 33 °C | 33 °C |
| OCCT AVX 2 | 82 °C | 86 °C |
| Cinebench 24 single-core (113 points) | 56 °C | 69 °C |
| Cinebench 24 multi-core (816 points) | 82 °C | 85 °C |
-
The PWM version was out-of-stock, and the older 3-pin (DC controlled) fans work fine, except at very low RPM, which isn’t an issue this case. ↩︎
-
TJ Max is the maximum thermal junction temperature i.e., the highest safe operating temperature for the CPU. At this temperature the CPU will start thermal throttling to avoid damage. ↩︎
-
This depends on the fans and their performance, of course. However, with identical case fans controlled to have the same RPMs (like our Arctic P12s), this holds true. ↩︎
-
Enabling EXPO, or EXPO II if available, doesn’t guarantee the higher frequency and better timings. It can fail if the memory modules aren’t compatible with the motherboard and/or CPU – pick RAM carefully. ↩︎