Deshrouding Asus Prime 5070 Ti OC
My 5070 Ti was the only thing making a noticeable noise when under a heavy load in my small form factor (SFF) case; I didn’t like that. So, it was time to make it silent.
The stock Asus Prime 5070 Ti OC is silent when idle, with its fans completely off. Its fans don’t randomly spin up, like on the 40 series Nvidia GPUs, and it’s even silent in its quiet mode (set with a switch on the card) under a medium load, like when playing older games.
The noise starts with more demanding games, which push the fans up to 70% (~1300 RPM), and that’s too noisy for me. While it wouldn’t be an issue in a tower case, the noise disturbs me in my HYTE Revolt 3 SFF case with mesh panels. My card also makes a slight rattle around 900 RPM, which, again, shouldn’t be noticeable in a larger case.
This is a follow-up to my Air cooled HYTE Revolt 3 build article, which addresses the GPU’s noise issue.
Table of contents
Expand the table of contents
TL;DR
- undervolted to 825 mV with core @ 2587 MHz and memory clocked +1500 MHz – power consumption reduced from 300W to max 230 W in Furmark and max 190 W in demanding games
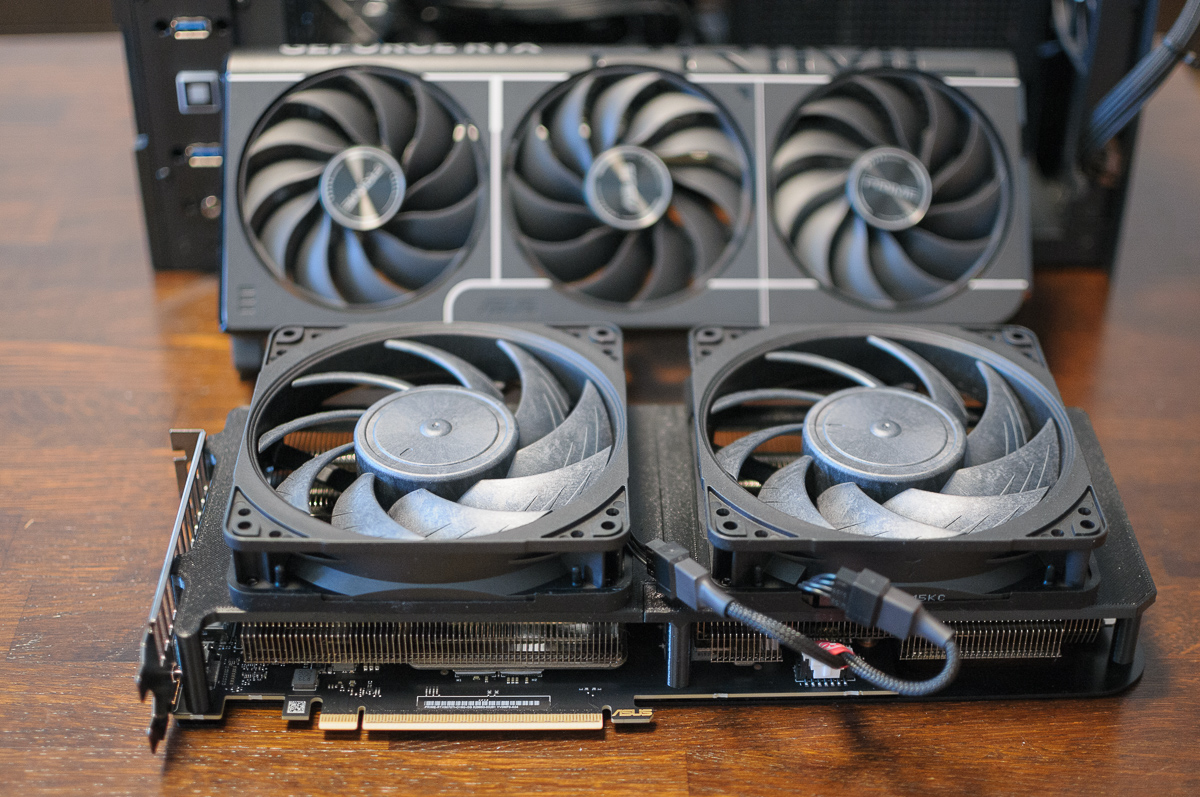
- original fans replaced with two Noctua NF-A12x25 PWM – 25 mm thick fans made the card little thicker, 57 mm, while 15 mm fans would make the card little thinner, 47 mm, when the fans touch the heatsink
- used dual fan adapter cable for the Asus TUF 30 series cards from gpuconnect – great service, thank you again!
- 3D printed an Asus Prime 5070 Ti deshroud bracket with PETg – this added 4 mm to the total card thickness, so the card is 61 mm thick now
- the bracket could be thinner, like 2 mm, maybe even 1.5 mm, to reduce the card’s thickness
- fans speed set to constant 40% (~900 RPM) – silent and improves case’s overall airflow, which also lowered the CPU, RAM, SSD, VRM and chipset temperatures by 5-10 °C
- idles at 29-30 °C, with ambient temperature around 28 °C
- reaches 75 °C in Furmark and 69-70 °C in demanding games like Cyberpunk 2077 and Doom: The Dark Ages
Undervolting
The first step in reducing my GPU’s temperature and power consumption was to undervolt it. After some tweaking, I found that my card is stable when undervolted to 825 mV, with the core clocked at 2587 MHz, and the memory at +1500 MHz.
This cut the power draw from the stock maximum of 300 W down to around 230 W in Furmark. In demanding games, it pulls 170 W on average and peaks at 190 W. This is with near-identical performance, a loss of just 1% FPS, and fans reduced their speed to ~1100 RPM.
This undervolt is my power-saving profile, which is good enough for 1440p gaming at 100 FPS. This card can be pushed beyond 2800 MHz, even slightly above 3000 MHz, but that requires a higher voltage. Also, the memory can be clocked at +2000, some people even reporting +2500 Mhz. That would increase power draw, temperatures, and noise, and I don’t need that performance today.
Deshrouding
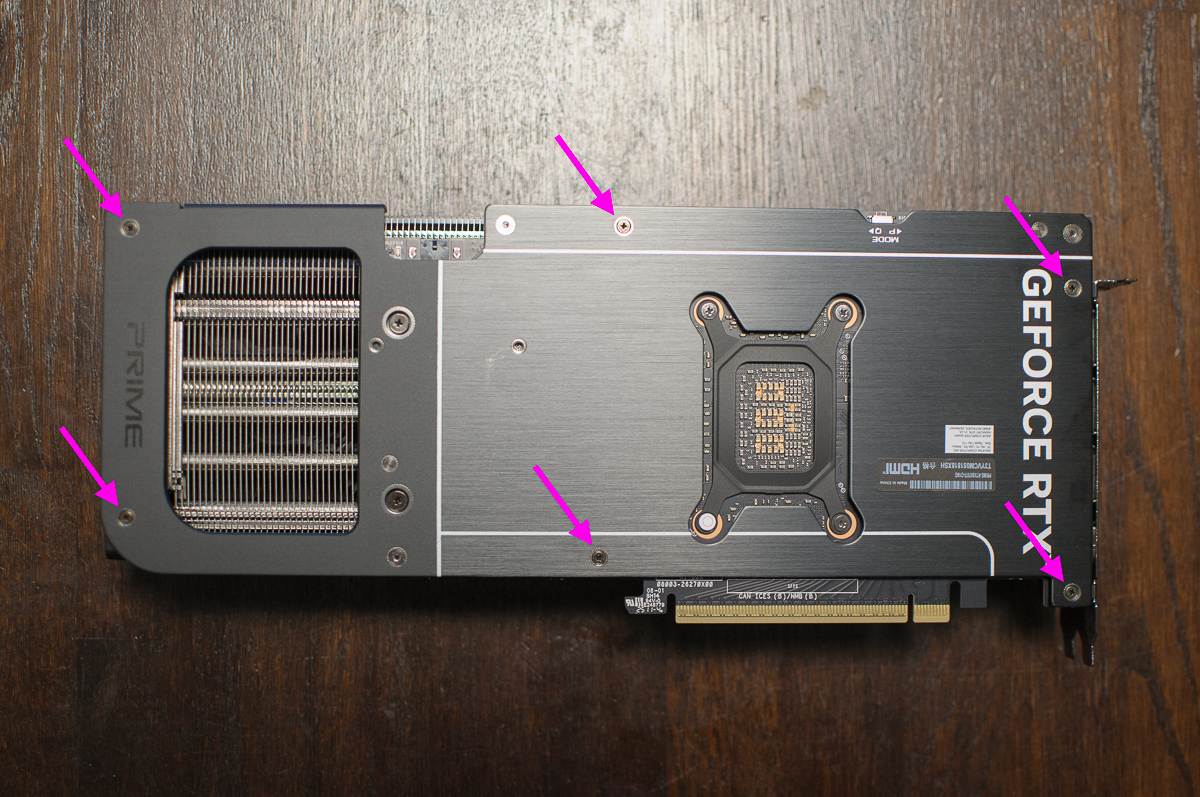
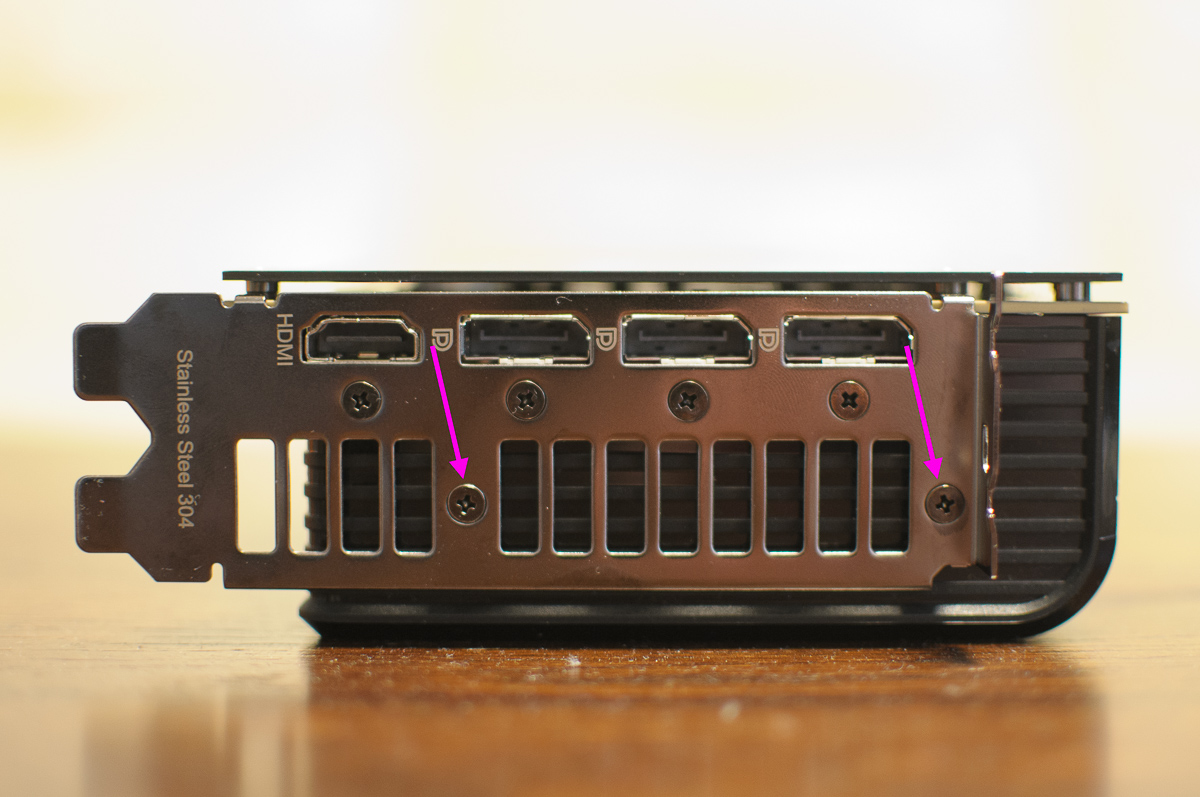
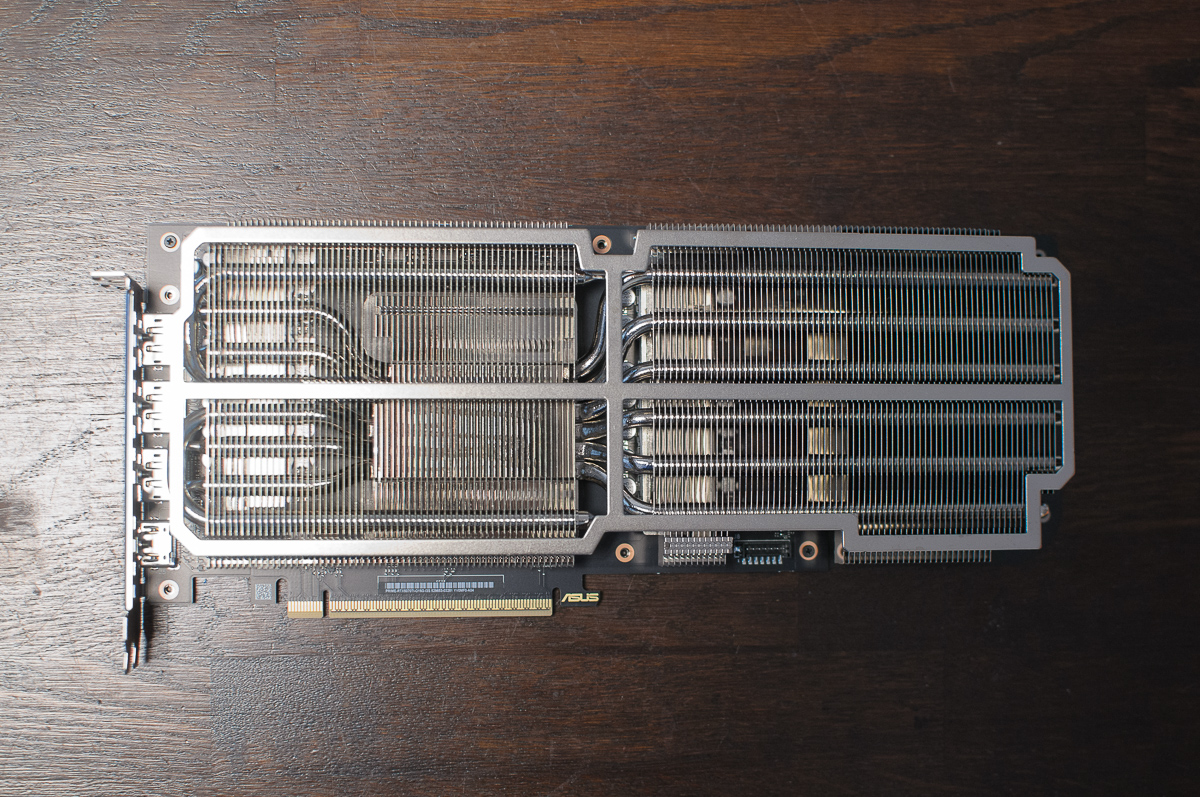
Undervolting improved temperatures and lowered the fans’ speed to ~1100 RPM, but that still wasn’t good enough for me. So, it was time to replace the noisy stock fans. Luckily, Asus Prime GPUs are very deshroud-friendly, it’s just eight accessible screws: six on the backplate and two on the I/O panel.
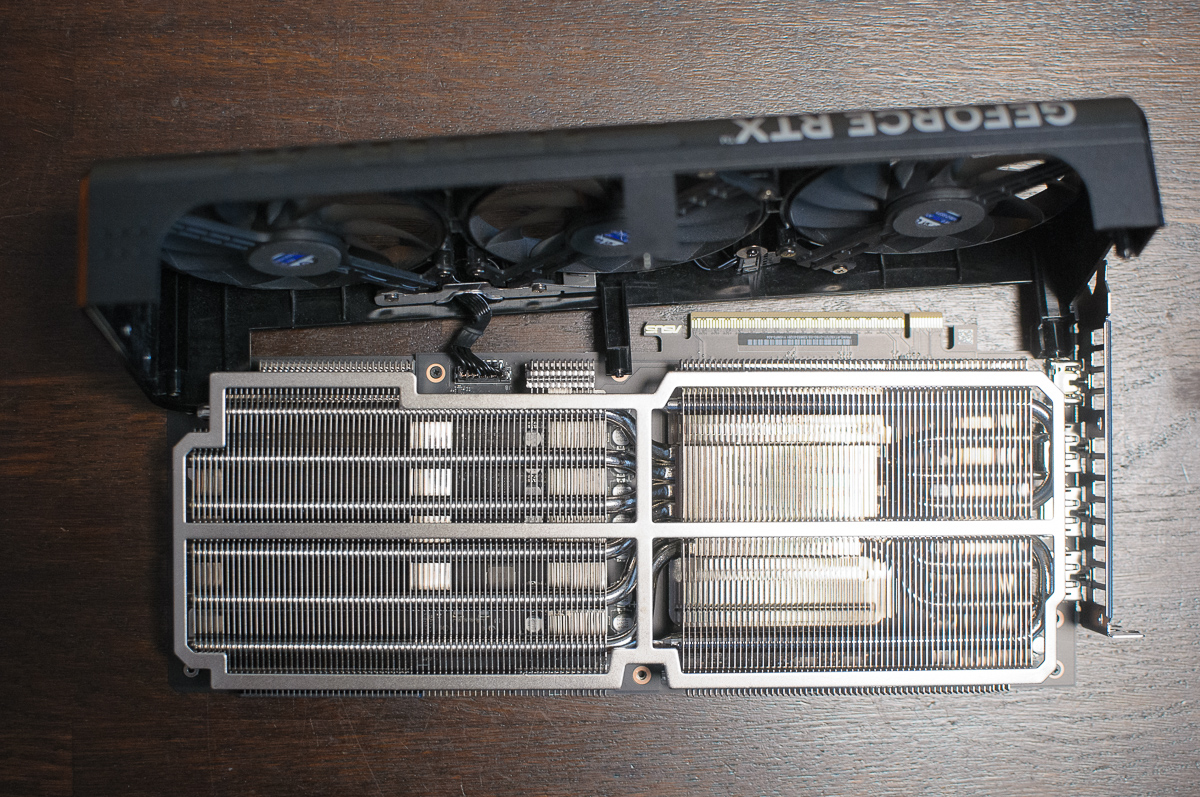
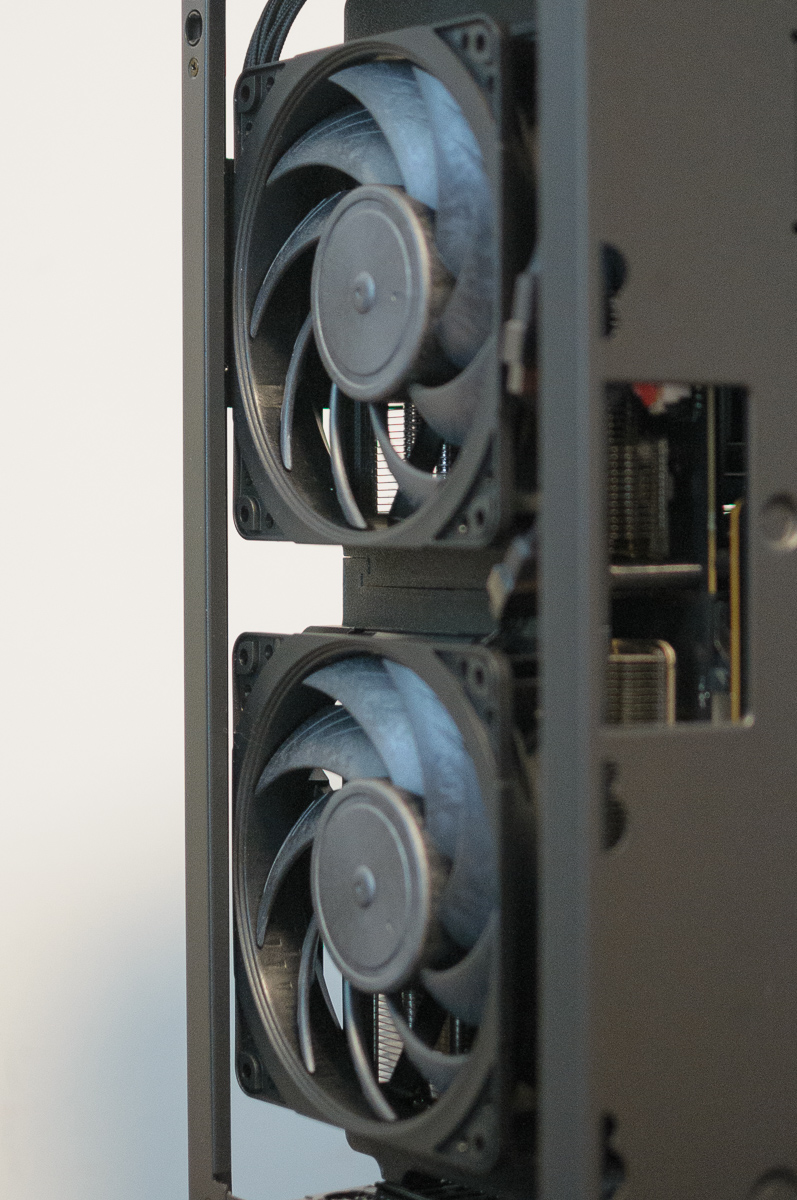
Fans
After removing the shroud with fans, I measured their height. The original fans are 18 mm thick, and the rest of the card is 32 mm. I knew I wanted to replace the three stock fans with two 120 mm Noctua NF-A12, but I was undecided on their thickness. While 15 mm is the usual choice in SFF cases like mine, the 25 mm will make the card just a little bit wider, at 57 mm. That was still well within my case’s 60 mm limit, so, two Noctua NF-A12x25 PWM it was.
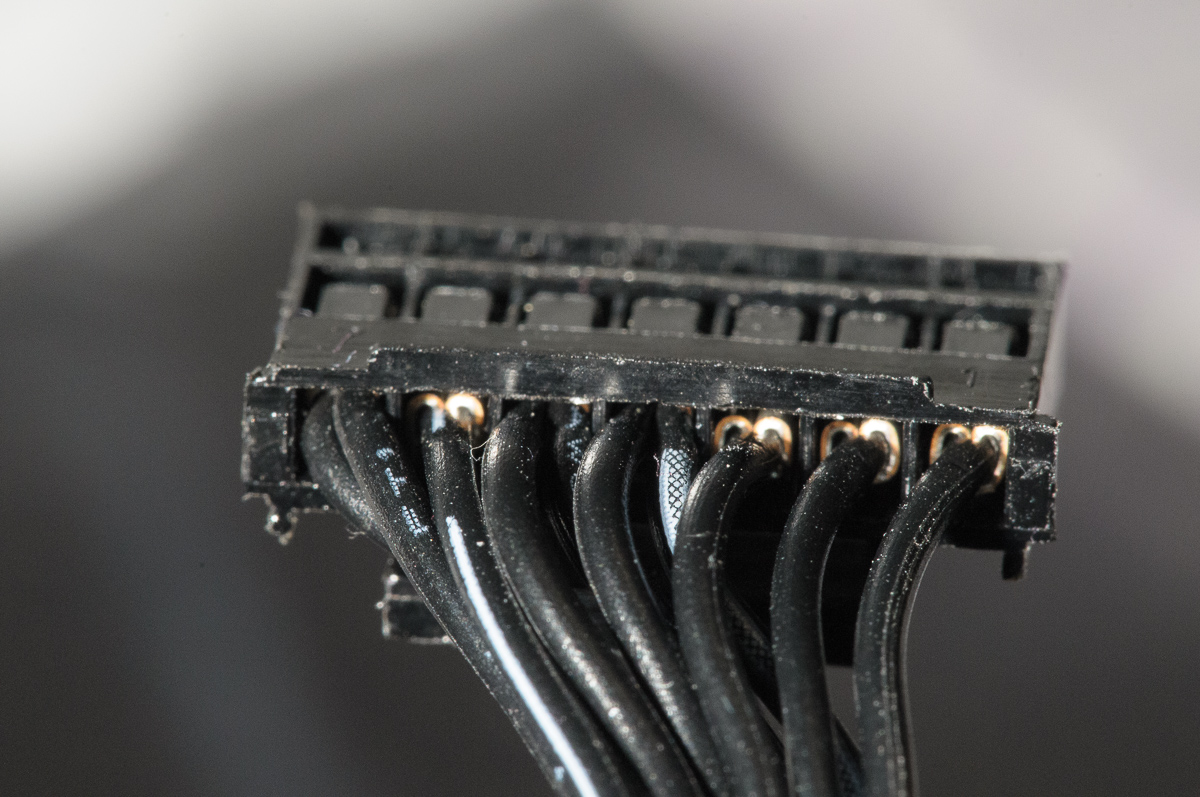
Fan connector
Another hurdle was the proprietary 7-pin fan connector on the Asus card. After some research, I found gpuconnect . They didn’t have a fan adapter cable for 50-series cards, so I sent them a quick email with photos of the 5070 Ti’s fan connector, and we figured out that the dual fan adapter cable for the Asus TUF 30-series cards should work. A week later, the cable arrived, and it worked!
Fitting the fans
Typically, fans on a deshrouded GPU are simply zip-tied to the heatsink. I found a much better solution for my card: a printable 3D model for an Asus Prime 5070 Ti deshroud bracket , which should also work for the Asus Prime 5080. This bracket was the inspiration for deshrouding my GPU :)
The bracket uses the original shroud’s eight screws and has dedicated mounting holes for two 120mm fans. I printed it with PETg, a plastic that handles higher temperatures well. The result wasn’t perfect because some of the mounting points were a bit slanted, due to printing. But it’s plastic, so bending it 1 mm was not a problem.
Assembling it all together
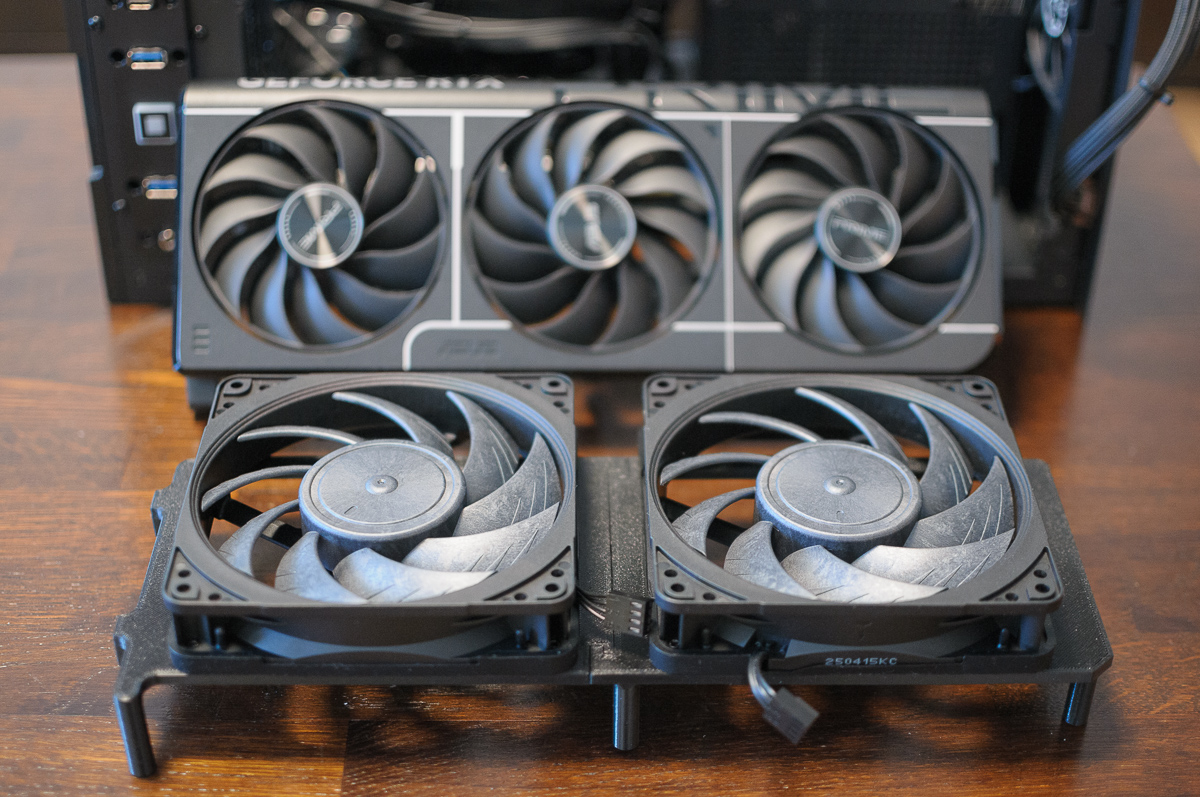
With all the parts ready, it was time to put everything together. I started by attaching the new fans to the 3D-printed bracket using screws. Next, I connected the fan adapter cable to the GPU and screwed the entire bracket onto the card using its original screws. The final step was connecting the fans’ cables to the dual fan adapter cable from gpuconnect.
Luckily, the Noctua NF-A12x25 fans have very short cables1, so there was no wiring mess to deal with. Check the photos below for a good fan orientation, which makes connecting to the adapter cable very easy.
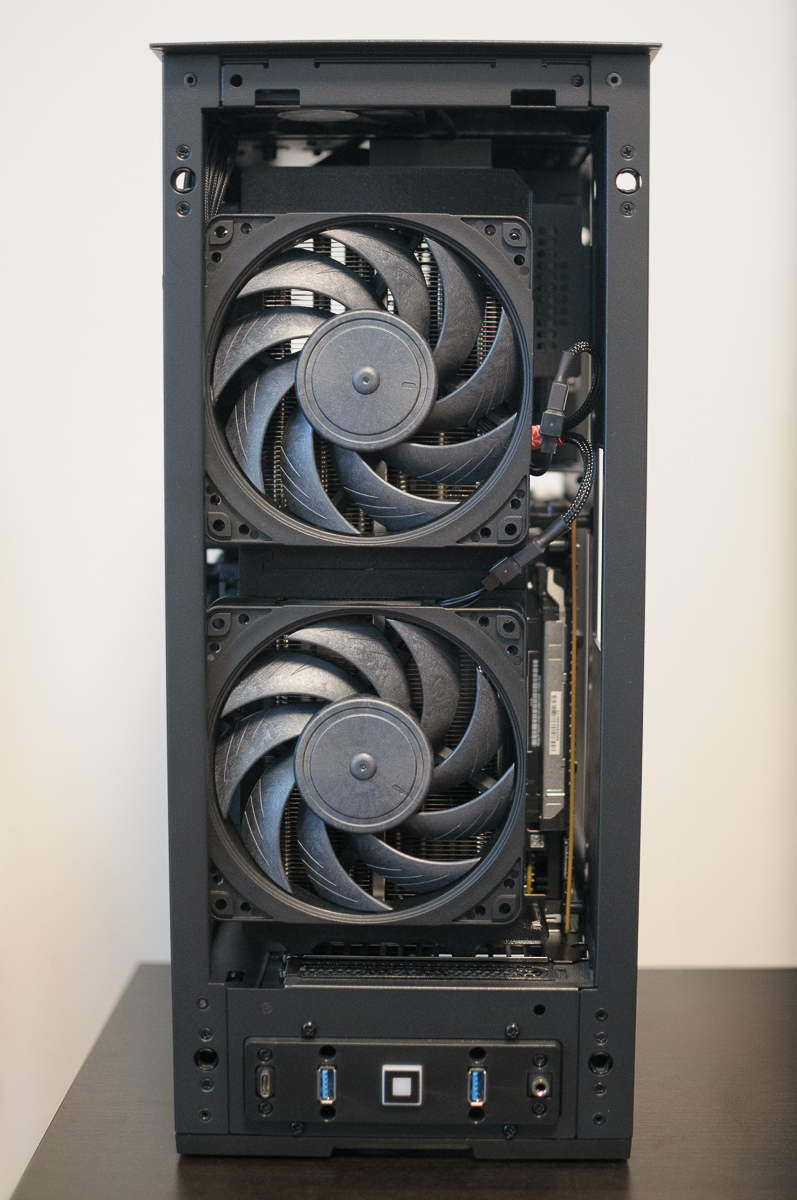
Now it was time to put it all into the case, but I ran into a problem. The bracket added 4 mm to the card’s thickness, bringing the total from 57 mm to 61 mm, which is 1 mm above the official GPU thickness limit of the HYTE Revolt 3 case.
“It has to fit,” I told myself, and with a bit of force, I squeezed it into the case. It was a very tight fit thanks to the case’s internal frame. The main issue was with the card’s height; if it was even a millimeter taller, it probably wouldn’t have gone in. There’s still plenty of space between the fans and the front panel; it’s the frame that reduces the maximum compatible GPU size.
RPM, noise, and temperatures
The dual fan adapter cable from gpuconnect is working flawlessly. The GPU can control the Noctua fans’ speed and also reports their RPM back to the system. The fans-off is also working well, so they are completely turned off when the GPU is idle. At light loads, the fans spin at 30% (Asus’s minimum), which is around 450 RPM.
Under a high load, the card sets them to 70%, which is around 1050 RPM2. This is good, but on the edge for me regarding the noise. The maximum temperature in Furmark is now just 63 °C, a big drop from the stock 71 °C.
That’s a great temperature drop, but unnecessary, and it leaves some room to make the card even quieter. I think the low-speed Noctua NF-A12x25 LS-PWM version would probably have solved this, since they run at a lower RPM at 70% and above, and would give me temperatures closer to the stock card. But since those weren’t available, I started tweaking the fan curve with MSI Afterburner.
I ended up with a constant 40% speed, which is around 900 RPM with these fans. This setting is completely quiet and keeps temperatures below 75 °C in Furmark. In demanding games like Cyberpunk 2077 and Doom: The Dark Ages, with max settings, path tracing, and DLSS 4 quality mode at 1440p, the temperatures stay at a cool 69-70 °C.
I also tried a constant 30% speed (~800 RPM), but the temperatures rose above 80 °C under high load, causing the GPU to throttle and lose FPS.
Why have the fans on all the time? To improve airflow in my HYTE Revolt 3 SFF case. The fans also act as intake, since they are near the front mesh panel and are slightly larger than the card. This lowered the CPU, RAM, SSD, VRM, and chipset temperatures by 5-10 degrees under all kinds of load.
Conclusion
Deshrouding the Asus Prime 5070 Ti OC was easy and worth it. Combined with undervolting, I have achieved a completely silent GPU under any load, even with a high ambient temperature of 28 °C. A constant fan speed of 900 RPM handles a full GPU load, with temperatures maxing out at 75 °C in Furmark and 69-70 °C in demanding games at 1440p. This also reduced power consumption from the stock 300 W to 230 W in Furmark and to under 200 W in games. The GPU even idles at a cool 29-30 °C.
This mod also improved the overall case airflow, lowering the temperature of other components by 5-10 °C. My only regret is that the second-generation Noctua NF-A12x25 G2 PWM fans were released two weeks afterward.